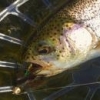
jd1983 0 Report post Posted October 19, 2013 This is my first attempt at the Royal Coachman. I have a couple things in mind to work on for the next one (like getting both wings on straight) but wanted to get other opinions. So, what would you pick out as something that needs fixing. Quote Share this post Link to post Share on other sites
jd1983 0 Report post Posted October 19, 2013 Sorry, I didn't realize how bad those pictures are. Can't find the real camera so I'm relying on the phone. Quote Share this post Link to post Share on other sites
hopperfisher 0 Report post Posted October 19, 2013 The only thing I would say is that your body needs to be better proportioned, it needs to be equal 1/3 sections. And the stuff that you said. What kind of hook did you use? The shank seems a bit long for a dry fly. Quote Share this post Link to post Share on other sites
FrequentTyer 0 Report post Posted October 20, 2013 As you know, the wings need work. They don't need to be pretty, but they have to be symmetrical or the fly will never land properly. I agree that the body sections should be equal, and I would shrink the whole body a bit to leave more room for the hackle. Having said all that, it is a good first try! Mike. Quote Share this post Link to post Share on other sites
Evans1 0 Report post Posted October 20, 2013 Looks pretty good. The one thing that really jumps out at me is that the tail is just a bit too long. The other stuff just needs to be fine tuned. Good job. Quote Share this post Link to post Share on other sites
flytire 0 Report post Posted October 20, 2013 even the tips of the tail body work is decent use quill slips from matched feathers (left and right side) wing should be located at the 1/3 shank hackle work not bad either. maybe equal wraps behind and forward of the wing. looks to be about 1 1/2 gape and thats ok use the step by step below for tying in the wings http://ukflydressing.proboards.com/thread/3059 video Quote Share this post Link to post Share on other sites
jd1983 0 Report post Posted October 20, 2013 Thanks for the comments, everyone. My original take on that fly was that, outside of the wing issue, I didn't start the body as far back on the shank as I should have and I crowded the body, wings, and hackle towards the eye of the hook. Glad to have those comments on the proportions, even tail, wing position, etc. I'm on #5 right now and will post some photos later. Quote Share this post Link to post Share on other sites
utyer 0 Report post Posted October 20, 2013 Your tail is just a bit short, use longer fibers so that the first black bar still ends up just past the end of the body. That hook does look a bit too long. It doesn't look like a standard length shank. The wings are not long enough (you know they are not set right,) the wing length should equal the body length. Your body starts far enough back. If you don't do equal thirds for the floss and herl, then make the center floss section the smaller section. All these are thing that will come together with practice. Quote Share this post Link to post Share on other sites
jd1983 0 Report post Posted October 21, 2013 The hook is a 1x dry fly hook from Hook & Hackle. Wasn't sure if I wanted the standard or the 1x. Now I know! Quote Share this post Link to post Share on other sites
1hook 0 Report post Posted October 21, 2013 Looks good... But I'm never too hard on flies. Quote Share this post Link to post Share on other sites
jd1983 0 Report post Posted October 22, 2013 Alright, this is attempt number 8. Overall, I think the proportions are better and I finally feel like I got the wing positioned close to where I wanted on the shank. My own view is that the tail could've been tighter and, even though I put 4 wraps of hackle in front of the wing, I ended up tying it back strangely when I did the head. I feel like this one is better than the first few. What do you all think? Quote Share this post Link to post Share on other sites
jd1983 0 Report post Posted October 22, 2013 Here's another previous attempt as well. Quote Share this post Link to post Share on other sites