JarrodRuggles 0 Report post Posted February 24, 2005 A few days ago...or maybe a week or so, a member was talking about online tying lessons using MSN. I 've been playing with the vidoe feature on my sisters dig. camera. The vidoes aren't good enough (yet) to teach or show other people. But, I was thinking about just picture tutorials. It wouldn't be over MSN or any other type of messenger. Just maybe in here using the same thread. I could be able to post tutorials every month. Maybe even up to 5 a month. If anyone would be intereseted in this...just say a pattern and I'll do my best. Just a thought , Jarrod Quote Share this post Link to post Share on other sites
JarrodRuggles 0 Report post Posted February 24, 2005 I'm thinking maybe about 20-25 steps. Or..would that be too many pics that would slow down the site or something. Quote Share this post Link to post Share on other sites
Guest Report post Posted February 24, 2005 We currently have a featured fly with over 50 pics, so that shouldn't be a big problem. Quote Share this post Link to post Share on other sites
JarrodRuggles 0 Report post Posted February 24, 2005 I 've been playing with this software and messing around with pics of flies. I think it could do the job.....Now.....................the big ? is what to tye. Quote Share this post Link to post Share on other sites
Graham 0 Report post Posted February 24, 2005 Hi Jarrod, I would love to see some dry fly tutorials, basically because I mostly tye nymphs and don't have much experience tying dry's. Whatever you tye I'm sure your tutorials will be appreciated. Thanks for offering your time and sharing your knowledge. Graham Quote Share this post Link to post Share on other sites
JarrodRuggles 0 Report post Posted February 24, 2005 sure thing.....ahhaaa finally got an excuse for stealing her cam. Will post some tomoorroww or hower you spell that. later..... Quote Share this post Link to post Share on other sites
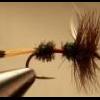
JarrodRuggles 0 Report post Posted February 25, 2005 This is the thread base for this fly. Notice where it stops...right at the barb. This is where the tail will be tied in. Sorry about some of the pics...gotta learn how to tye with one hand . \ Here you see a merganser feather. This is the feather I chose but you can use whatever you like. (Exp. Woodduck Mallard etc.) Mix up the colors and figure out what gets best results. Get a rough measurement of how long the tail should be. On this one...Its a little shorter than the shank. Tye in the tail and wrap back to the barb. Quote Share this post Link to post Share on other sites
Graham 0 Report post Posted February 25, 2005 Hi Jarrod, Thats a nice start, do you have a Macro setting on the camera? It took me a while to get used to taking close up shots of fly's and I still struggle with it. Graham Quote Share this post Link to post Share on other sites
Guest Report post Posted February 25, 2005 It does appear that your camera is focusing on that object to the left of the pic, that looks crystal clear while the rest is blurry Quote Share this post Link to post Share on other sites
JarrodRuggles 0 Report post Posted February 25, 2005 Here I am just simply twisting the dubbing (homemade) and tapering it by picking out some. Theres no need to grab that much but I NEED to get rid of this stuff, ( even if it goes to the vacuum). Just get it fairly tight and start wrapping it. Add more if you need more taper to it as you go. Heres the body. Leave about 1/3 of the shank to tye in hackle etc. Tye in some hackle after stripping the quills of where it will be tied in. Then tye in some more merganser as a wing. On this pattern the wing is about the same as the tail..a little shorter though. Tye the wing in where the tips are facing forwards (towards the eye) Try to make it as smooth as possible so the hackle wont go crazy on ya. carefully try to push the wing back a little so you can wrap in front of it and make it stick up straight. put a few wraps in front of the wing. Shape it up a little bit by picking things that dont belong out of it. Maybe pieces of dubbing or something. wrap your hackle about 4 turns. Keep it fairly tight. Push the wing forwards a little and wrap once in front of the wing. Put one tight wrap to secure it. Push the fibers out of the way and wrap a few more times. trim the stem and make a smooth head. Your done after whip finishing and applying cement. Easy as that. This is a really simple pattern to tye. Once you get everything down you can whoop these babies out by the 1000's. very effective! again sorry about the pics. This was just sort of a quick experiment. The next one will all be like those last good pics. JARROD Quote Share this post Link to post Share on other sites
JarrodRuggles 0 Report post Posted February 25, 2005 The bluriness is just my fault. I porbaly knowck the camer or something while I was taking the pic. Plus I could use more light. Its a start....The next ones will be better. Too bad all these pics arent like the last few Quote Share this post Link to post Share on other sites
JarrodRuggles 0 Report post Posted February 25, 2005 I do agree with you...It was seeming to focus on part of the vise. Maybe the little focus box is off or something..I'll get it one of these days Quote Share this post Link to post Share on other sites
CapeBSalar 0 Report post Posted February 25, 2005 Looks good jarrod! Man that's a nice looking piece of hackle. Nice stiff barbs, is the Whiting? Quote Share this post Link to post Share on other sites
Graham 0 Report post Posted February 25, 2005 FANTASTIC Jarrod, I had the same problem with my camera until I found that when taking close up pics the little eye-piece-view-finder does not look through the lens so it does not focus properly close up. When taking Macro shots I have to look at the LCD screen on the digital camera because that looks through the lens and will allow for a close up focus. I'm not sure what I would do if my digital camera didn't have the LCD? It took me about 4-5 years to finally figure this out. This year my close up insect pics will turn out well, finally. Thanks for the tutorial, great work. Graham Quote Share this post Link to post Share on other sites
JarrodRuggles 0 Report post Posted February 25, 2005 yeah..its like a silver grade or something. When I first picked up her camera I just looked through the lcd instintively ... when I think about it though, it would be easy to completly miss the whole fly becuase the viewer thing itnt in line with the lense. Next one will be coming soon. Someone just say the pattern. JARROD Quote Share this post Link to post Share on other sites