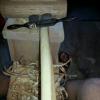
Poopdeck 0 Report post Posted February 12, 2017 I rarely, like almost never, tie dry flies since trout are not high on my list of targeted species. However, I am preparing for retirement and suspect I will be doing a lot more trout fishing in the near future. This is my first attempt at a parachute fly and I'm looking for a heavy dose of constructive criticism to shorten my learning curve. I won't take any comment as a negative, I won't rationalize any flaws so give it to me good. I'm already thinking the thorax needs a little more build up but I don't know. Let it rip, I'll tie a second based on your pointers. Quote Share this post Link to post Share on other sites
flytire 0 Report post Posted February 12, 2017 follow this and youll be all set Quote Share this post Link to post Share on other sites
Jaydub 0 Report post Posted February 12, 2017 It looks like you used two hackles like a parachute Adams? I'd start with a single hackle until you get the hang of it. When wrapping two parachute hackles, i prefer to wrap them together, rather than one at a time. General tips: Form a good smooth base of thread on the post. When tying in the hackle, leave enough bare stem to reach the top of the post. Tie the bare stem to the post, tying it down all the way to the top of the thread base. Or don't tie it to the post and wrap the bare stem in one turn to the top of the post then wrap down the post. Wrap the hackle down the post, keeping each turn directly below the previous one until you get to the bottom. If you wrap the hackle counter-clockwise (looking down from the top), the fibers will angle away from you at the head and you will trap fewer fibers. I prefer to tie the hackle off to the bottom of the post, in the same direction as the hackle. Then make a single wrap to just behind the eye and finish the head. Quote Share this post Link to post Share on other sites
Adam Saarinen 0 Report post Posted February 12, 2017 It's very good information you allways provide on this forum flytire! Thankyou! Quote Share this post Link to post Share on other sites
Dave G. 0 Report post Posted February 12, 2017 I think it is an excellent first parachute ! 1 Just to get picky since you asked, To me the hackle stacks up too high , keep your wraps tight together for a lower profile. 2 I could do with a few less tailing fibers ( but that is subjective and open to personal taste). 3 Something that has helped me in tying parachute flies is a drop of super glue at the base of the post, let it wick part way up the post and harden. It makes wrapping the hackle much easier. It only takes a tiny drop, you don't want to soak it. 4 And you can still go back in a wrap some more dubbing into that thorax. Quote Share this post Link to post Share on other sites
Fletchfishes 0 Report post Posted February 12, 2017 Nice fly. If you pushed for feedback, I'd say: - Tail is a little too long - Thorax could use more thickness - body could be a little thinner (subjective based upon the mayfly) - tail could be thinner - I like to keep the hackle wraps lower on the post to keep the center of gravity lower Nothing major, I'd say these are all not picky as there is nothing seriously wrong with the fly whatsoever. I've switched to using turkey flat for my posts. Give it a try if you have some hanging around. Interesting color combo. Looks like a PMD / Sulphur body but I normally expect dun hackle for those. Quote Share this post Link to post Share on other sites
rstaight 0 Report post Posted February 12, 2017 To start, I would fish that fly all day. But I get what you are asking, you want to tie the best fly you can. As mentioned earlier the hackles are a little far up on the post. I looks like you used a furnace and grizzly hackle. Nothing wrong there just make less wraps of each. The tail appears to 1 1/2 times the shank. Shorten it up and take some fibers out of it. Refer to Flytier's post. Nice start. Quote Share this post Link to post Share on other sites
SilverCreek 0 Report post Posted February 12, 2017 I rarely, like almost never, tie dry flies since trout are not high on my list of targeted species. However, I am preparing for retirement and suspect I will be doing a lot more trout fishing in the near future. This is my first attempt at a parachute fly and I'm looking for a heavy dose of constructive criticism to shorten my learning curve. I won't take any comment as a negative, I won't rationalize any flaws so give it to me good. I'm already thinking the thorax needs a little more build up but I don't know. Let it rip, I'll tie a second based on your pointers. File Feb 12, 10 54 40 AM.jpeg I see lots of opportunity for improvement. 1. You are correct that there is NO dubbing at then post or in front of the post,. The ENTIRE body from tail to the the tie off should be DUBBED. 2. The thread color should MATCH the dubbing color. It looks like you used GREEN thread with sulphur dubbing. If you had used yellow thread the lack of dubbing as noted in (1) would not be as obvious. 3. The hackle is POORLY wrapped. IT is asymmetric on the post. The second hackle you wrapped down has trapped sections of the first hackle that was wrapped and pulled it back to the rear. So there is more hackle pointing to the rear than forward. 4. Hackle used is too long. It is about 3 hook gaps long. You can use longer hackle for a parachute than for a palmered hackled dry. So you can use a size 12 hacle for size 14 fly BUT in this case it looks like you used a hackle that was 2 sizes larger. 5. Tail fibers are too long and too many are used. The dubbing of the body can be corrected by using following sequence of construction: 1. Tie tail fibers in first. 2. Tie in post and wind thread up post to prep post for hackle. 3. Prep, stack, and tie in brown and grizzly hackle. Post up the hackle, and bring thread back down post and take thread to tail. 4. Dub the body to the post ALL the way to behind the eye leaving room for tie off. Thread hangs off the BACK side of the hook. The fly will now look like this. In this image the hackle is partially hidden behind the post. 5. Wind hackles TOGETHER CLOCKWISE down the post. This avoids trapping hackle when you wind separately. 6. On the last hackle wrap take it UNDER the THREAD that is hanging over the other side of the hook. Instead of holding the last hackle wrap behind the hook eye and taking the thread OVER the hackle, you have taken the hackle UNDER the thread which does the same thing and avoids catching the other hackle fibers that form the parachute. The weight of the bobbin will hold it in place. Now you can bend the post back toward the rear of the hook, holding any hackle fibers away from the area hook eye as you take a few more wraps and whip finish the thread behind the eye. Alternative method after step 4 above - whip finishing on the post. 5. Take thread to base of post. Take a half clockwise wrap of thread AROUND the base of the post so that the tread now hangs on YOUR side of the hook. 6. Wind hackles TOGETHER CLOCKWISE down the post. This avoids trapping hackle when you wind separately. 7. At the base of the post, wrap thread around the hackle and post CLOCKWISE. Then whip finish at the base of the post. Here’s a video on whip finishing the hackle on the post http://www.youtube.com/watch?v=ash9xlE6_zA#t Variation: You can also use the way Charlie Craven does it. He ties off on the post but whips behind the hook eye. Charlie ties left handed so you will need to look at it in the mirror to get a right handed view. The key direction is this image: Quote Share this post Link to post Share on other sites
Poopdeck 0 Report post Posted February 13, 2017 Wow that was some great feedback from everybody. You guys were encouraging, inspiring, and provided some great tips. Funny thing about the colors, I had a plan but as I started tying I focused more on the actual technique then the colors. I will have to work on that. So I printed out the thread and took it to tying bench so I could incorporate everyone's tips. Here is my second parachute. Hopefully I improved on some things but I know there's more to work on. One thing I think is I'm wrapping the hackle to tall. What say you? Quote Share this post Link to post Share on other sites
rstaight 0 Report post Posted February 13, 2017 Tail is much better. The length of the hackle is good. But you are correct about wrapping it to tall. Try one where you feel you are crowding it and see how that works out. Quote Share this post Link to post Share on other sites
SilverCreek 0 Report post Posted February 13, 2017 Much, much better. I am impressed with how much better the second fly looks! Minor areas to improve. 1. Tail has rolled a bit to the far side. Work on centering it on top of the hook. 2. Body is still a bit too bulky. I think part of this is due to the amount of material you used for the post. Try a fly with half of the material and you will have less bulk at the wing and this will allow for a thinner thorax and a thinner body overall. 3. Shorten the thread tie off area behind the eye, You do not want to crowd the eye, but you also do not want to have too long an area with thread and no dubbing. Notice how matching the thread color to the dubbing makes the longish thread tie off less noticeable. 4. Trim the hackles shorter at the tie off so they do not go over the hook eye. Quote Share this post Link to post Share on other sites
flytire 0 Report post Posted February 13, 2017 i tie in posts like this tie on post material on top of hook shank then i turn the post material so that it perpendicular to the hook shank and make x wraps to secure. then i roll the post material to the underside of the hook. gather the material above the hook and wrap thread up the post you can add a drop or two of crazy glue or uv resin to the post but its not totally necessary Quote Share this post Link to post Share on other sites
Dave G. 0 Report post Posted February 14, 2017 Yes the hackle is wrapped too far up the post. When I wrap mine I keep it right down on the hook shank almost, 3-4 turns very tight together in spacing. It's not like working forward on a traditional tie, you don't need to climb far up the post unless that is some special effect you are aiming for.. The rest of the fly is improved. The tailing fibers are about the right density etc but it does look like some slipped to the far side of the hook when you tied them in. And incidentally, I'd fish both flies ! Quote Share this post Link to post Share on other sites
Poopdeck 0 Report post Posted February 14, 2017 I'm amazed you guys saw the tail roll in the picture. I didn't see it on the fly until after it was pointed out. Good eyes. Still have to start thinking about the colors. Flytire, I'm not comprehending when you say you roll the material to the underside of the hook and then gather the material above the hook. Are you pulling the two wings down, wrapping them around the bottom of hook and then back on top where you wrap the post? Dave G. It's definitely not a special effect. The next one I will start lower. I will take these two and throw them in my blue gill altoid tin so I will defiantly be fishing them. Maybe after the third they will start going into my trout box. Silver creek, now that I look at flytire's post I think you are correct. I will thin the post. Thanks again for all the help. Work is gonna get I'm my way until the weekend but I'm on call this week so the weekend may be a wash to. I may have a small window tomorrow for more practice. 1 year, 11 months and 16 days (465 shifts) left unless I leave earlier and work will no longer be an issue. Quote Share this post Link to post Share on other sites
Dave G. 0 Report post Posted February 14, 2017 Oct. 31, 2014 I retired. Wishing you well, it will go by fast. For the record, I'm pretty sure I've caught more trout with less perfect flies than I have almost perfect ones, rolled tails and all LOL ! Quote Share this post Link to post Share on other sites