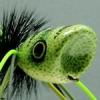
Stippled Popper 0 Report post Posted August 21, 2017 Laying Shades Of Color From: Using Stipple Dots To Add Detail To Fly Rod Poppers And Sliders - 2017 Version Ingredients: Paint: White, Black, Mixed Olive, Mixed Seminole Green(2 shades), Pure Seminole Green Tools: Brass Rods in Three sizes for the eyes. Several different diameter blunted needles Popper Body / yours for choice Appropriate hook of choice Brush Light Olive color on the top half and White on the bottom half half of the popper. Dot in the lightest Seminole Green over the upper region you have painted Light Olive. Dot the Light Olive color into the brushed White area of the popper. Note larger dots are added where the two colors meet and increasinglly smaller dots further down. Dot White dots into the brushed Light Olive are of the popper stopping before reaching where the Light Seminole Green dots have been placed. Dot Medium Mixed Seminole Green into the area where the lighter Seminole green was added. Leave areas of the Olive and lighter Seminole green visible. Dot in the Pure Seminole Green color, more widely spaced, into the top of the popper using the same size tool and then much smaller dots into the rest of that area. Again, do not completely blot out the Olive and lighter colors. Continue adding small pure Seminole Green dots into the White area of the popper. The line where the two brushed on background colors meet should no longer stand out. Scatter a few Seminole Green dots in the White bottom of the popper. This should be the smallest dots of all those placed. It is time to add in the eyes. My preference is to place the eyes just shy of the very front and as close to the center from top to bottom as possible with the unaided eye. I flip the popper over so I can see the front edge to place the first eye dot on the other side. If you are uncertain of your steady hand. Place the eyes before step one above. You don't want to have wasted all the effort before this step by mucking up the eye. Place a smaller White Dot inside the Black dot. Place a smaller Black dot within the White dot. Center it or somewhere else in the White area according to you whim. Optionally add a gleam dot to the eye of the popper. Add dots into the cup of the popper. Leave spaces for smaller dots to be placed in the next step. Place dots between the dots in the cup which you added in the previous set. On the lip of the popper add a few dots. Finished and tailed poppers using this design in different colors. . . Royal Blue over top of Blue Heaven and Olive over Lemon Lime Quote Share this post Link to post Share on other sites
RickZieger 0 Report post Posted August 21, 2017 Nice tutorial. Rick Quote Share this post Link to post Share on other sites
fshng2 0 Report post Posted August 22, 2017 Nice work, thanks for sharing. Quote Share this post Link to post Share on other sites
AZWoolybugger 0 Report post Posted August 25, 2017 Beautiful work as always! Thanks for the tutorial. Quote Share this post Link to post Share on other sites
Mike West 0 Report post Posted August 26, 2017 I've tried to duplicate your effects before with mixed results. Although some of them came out OK none of them came out as nice as yours. This helps a lot to understand how you achieve it. Going to have to give it another try it now you can never have too many poppers . Thank you for taking the time on doing this tutorial Quote Share this post Link to post Share on other sites
Stippled Popper 0 Report post Posted August 26, 2017 Thanks for the comments. As you can probably tell, each image is of a separate popper I worked on and then photographed each step together in one session. I think this is easiest to see in the images of painting the eye. It takes longer than photographing each step in one popper. But it helps me work on consistency. Quote Share this post Link to post Share on other sites