
xXFLYFISHXx
-
Content Count
46 -
Joined
-
Last visited
-
Only that red reel has markings on it. I think the black one must have been hand made by someone. I don't really want to take it apart to check the inside for markings. It's to bad that's my favourite one... Here's a couple other pics
-
Sorry, this rod sock goes with the red butted rod too... And here is the other rod, I don't think it is near as nice as the red butted one...
-
Sorry, that took way longer than I expected. Here's some more details. This post is all on the rod with the red but end... This is all I could find as far as markings
-
Thanks for the help everyone, I'm really excited to learn more about it all
-
When I get home I will get pictures of every marking they have. They are very hard to read but maybe you guys will recognize them. Yeah that's what I read too, Ill have a closer look when I'm home in a half hour or so...
-
And here is the rest of it... I hope you enjoy looking at it as much as I do!
-
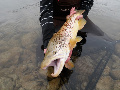
I thought you guys/girls might be able to give me so information on my GREAT GREAT grandpas fly fishing stuff. I don't know a lot about any of it so any input would help. Here's the pics I think this thick piece of bamboo is a wading stick... Any other ideas?
-
Correct Color for your local PMD??
xXFLYFISHXx replied to flyfishing99's topic in The Fly Tying Bench
I'm in Alberta and here they are almost white. I use a rust colour floss underbody and then I very thinly dub cream superfine dubbing on top. Then when the fly gets wet the orange will glow through just enough to mimic a pmd. -
Thanks. I´m not sure because this is a pre made body from SIMAN called Tube body Terje There a great product for sure,definatly worth buying especialy if it's picky trout your after. My only problem is that after a couple fish they stretch out and become flimsy. Thay catch no shortage of fish though. I must say you make beautiful flies. I love how they all are awesome ties, I can't remember one fly of yours I haven't enjoyed.
-
I like it, good and simple nice tie. yep I just cut the body's with curved sizzors and wrapped thead around creating segments. Here's a vid to get the main Idea I use a sewing pin instead of that fancy tool he uses. http://m.youtube.com/index?desktop_uri=%2F&gl=CA#/watch?v=ZEFt8iMI2tI
-
I haven't posted in a while so here's a nice pattern I came up with earlyer today. Hook- light wire Czech nymph hook size 12, I used a partridge CZF Thread- white or tan 6/0 uni Tail- fine barred tan rubber legs Body- segmented foam body made separately on a pin then tied to fly Wing- thin clear packaging foam Legs and horns- tan barred rubber legs Underbody- golden Antron dubbing Shell/head- foam tied in at eye and folded back to form a head Tip- carry a few permanent markers with you so that when you find yourself in a stonefly emergence you can alter the color a bit to match the hatch more effectivly.
-
sorry for the poor picture at the top I posted the wrong one.
-
Heres a step by step that is of a very important fly in my area(alberta) that the trout seem to not be able to resist when the boatmen are around. The fly is very easy to fish just apply some sinkant on your tippet and when you pull on the fly it will dive then pop back up. Just strip it occasionaly and let it pause and you will hook fish. Put your hook in the vice and make a thread base just past the bend of the hook. Cut out a peice of foam (yellow white or brown) about as wide as the hook gap Tie in the foam at the end of your thread base and make a body by covering the whole under body with an even layer of thread Tie in black rubber legs of your choice on the middle of the underbody move your thread to the eye of the hook and tie in the foam as an overbody Fold the foam again to make a head and tie down and whip finish. Clip the legs and the access foam, then you can color designs on the back if you want and your done.
-
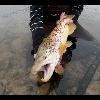
Here is a high floating, easy to see fish catcher that works great fished close to the banks. I just tried this pattern out on my new favorate high mountain lake and got hundreds of cutthroats 16+inches for the two days I fished. Heres how to tie it... Materials List -Hook Mustad 94840 will work great but so will most dry fly hooks. I like a size 14, sizes 16-8 are probly good to experament with aswell -Thread is nothing to be picky about, any dark colour of 6/0 or 8/0 thread will be fine -The over body of the fly is two peices of sheet foam each at half the width of the hook gap -The underbody is a few peices of peacock herl -The legs are any black rubber legs but I used a bass skirt for this particular fly just because thats what I have -The Hi-vis part of this fly is the peice of coloured foam on the top of the fly. Any bright colour will work but I use yellow. Orange would be great too. Step 1. Set a thread base covering the hookshank of a mustad 94840 or equivalent to the start of the bend. Step 2. Cut out two strips of sheet foam and tie them on to the hook. Step 3. Grap two or three strips of peacock herl and tie them on to the rear of the hook tight to the foam. Dipping them in water will make sure the fragile stems dont snap when you start wraping them. Step 4. Move your thread up the hook shank about 2/3 of the way and wrap your peacock herl to that point making a good and thick abdomine. Step 5. Fold over the two strips of foam and tie them down forming what kinda looks like two wings laying over the body. Dont clip them as you still need them to make the overbody of the thorax Step 6. Tie on the Hi-vis part of the fly which is just a thin strip of coloured foam and clip each side short Step 7. Get out a long peice of rubber leg material and tie it on one side of the fly. Then fold it aroun the back and tie it on the other side. Then clip the back hoop that was made creating two legs on each side. Step 8. Tie on two or three more peacock herls and wrap in between the yellow foam and legs once and then make the underbody of the thorax to the hooks eye. Step 9. Fold the remaining two strips of foam over the thorax and clip them a little long forming a little head. Step 10. Tie off the thread under the foam head,clip legs as needed and the fly is done.
-
Ditto... I like those yellow eyes, too. Nice ties. Thanks To make the extended bodys I... I took a fine sewing pin and covered it in lipchap. Then I put a light layer of thread along the pin to the point(put the thread as long as you want the body). Then I coverd the thread covered pin in some silicone. Then I got some very light antron dubbing(not sure what brand) and very lightly dubbed down(away from the point) to as long as the thread. Then I covered that in more silicone and layed a few fibres of the dubbing along the silicone covered body and spun them onto the body with my fingers. It takes a while to get good at it but it works very well and is pretty strong. I would start by making thicker bodys like for a sonefly or caddis dry because the thicker bodys are easyer to do. Tell me if I dont make any sense and i`ll try to write it out in a understandable way.