Futzer 0 Report post Posted February 20, 2009 Just wanted to know from the Photographers out there any tips to get better macro images. Especially what to do for color correction. I currently have a Canon PowerShot S400 4Mp, your all around small do everything style. I am also hoping we can get some discussion on general do's and don'ts for the beginners. And maybe some advice on a standard pixel matrix amoungst us. Cheers, Jeff aka Futzer. Quote Share this post Link to post Share on other sites
RJD31 0 Report post Posted February 20, 2009 Jeff The following links should be helpful. http://www.flytyingforum.com/index.php?sho...ic=2984&hl= http://www.flytyingforum.com/index.php?sho...c=31327&hl= http://www.flytyingforum.com/index.php?sho...5&hl=camera http://www.flytyingforum.com/index.php?sho...9&hl=camera http://globalflyfisher.com/gallery/digitizing/index.html Ron Quote Share this post Link to post Share on other sites
Old Hat 0 Report post Posted February 20, 2009 I'm not a photographer by any means of the word. I have a hard time being consistent and with playing with exposure on my fly pics. I have recently found though that throwing some light from behind the fly whether reflected or other really helps to make the fly stand out against the backdrop. It kind of outlines the fly and brings out a lot of detail. Quote Share this post Link to post Share on other sites
brandon722 0 Report post Posted February 20, 2009 This is a very informative site: FlyArtStudio.com Quote Share this post Link to post Share on other sites
purolohi kalastaja 0 Report post Posted February 20, 2009 I have two Ott-Lights - a large floor model, and a smaller clamp-on version. I position the large lamp so that it is above, and slightly in front of, the fly. I set the camera up on the tripod and set the timer feature once I have proper focus. THEN I press the "shuttter" button and hold the smaller lamp under the fly pointing up so that it eliminates most shadows. I don't use a photo box like I have seen others do, but merely a background. Quote Share this post Link to post Share on other sites
Futzer 0 Report post Posted February 20, 2009 Ok now we are warming up, thanks everyone so far. Cheers, Jeff. Quote Share this post Link to post Share on other sites
the saltydog 0 Report post Posted February 21, 2009 I use a sheet of blue foam that comes with the big ole pack of foam for 5 bucks from Michael's craft store that I buy for tying flies as the background, put my sony auto-everything camera on macro and take the pic from about 2 feet away and zoomed into the fly. Then if I do end up with any shadows I can correct that with Iphoto on my Mac and crop. I wonder if a cross post of this thread to the photogs would be of value? Quote Share this post Link to post Share on other sites
Futzer 0 Report post Posted February 21, 2009 I use a sheet of blue foam that comes with the big ole pack of foam for 5 bucks from Michael's craft store that I buy for tying flies as the background, put my sony auto-everything camera on macro and take the pic from about 2 feet away and zoomed into the fly. Then if I do end up with any shadows I can correct that with Iphoto on my Mac and crop. I wonder if a cross post of this thread to the photogs would be of value? Thanks SD, I did a thread post to the Photography forum, and hopefully they will chime in. Jeff Quote Share this post Link to post Share on other sites
BruceC 0 Report post Posted February 21, 2009 Something I learned in the advertising business a while back for shooting small objects with smooth, soft lighting. Take a Clorox bottle or any gallon size contain that is frosted. Cut the bottom off so that the container stands upright but without the bottom in place. Then cut out an upside down U-shaped opening on one side to allow your lens to peak in. Set your object inside the container on a small stage draped with what ever color felt or background material you might desire. Felt or black velvet will soak up any residual shadows. You can then blast light in from any angle: sides top and anywhere in between. The light is diffused through the walls of the container and you literally have the same lighting as if you purchased an expensive soft light. In reality, it's basically a mini tent light setup but the good news is that it's very cost effective and works like a charm. I've been in photo sessions over the years with very hi-end jewelry pieces that ended up inside a clorox container. Best, Bruce Quote Share this post Link to post Share on other sites
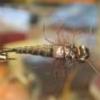
Houndog 0 Report post Posted February 21, 2009 This is a pic of the setup, a light over the fly, vise angled a bit to help light the side and a piece of blue foam in the background. Using a Canon SD300 4MP camera, macro mode, no flash, no tripod (but it would have helped). If you use a flash you should use tissue to diffuse the light (can be harsh up close). This was a quick setup, I'm sure this can be improved upon. Quote Share this post Link to post Share on other sites
BruceC 0 Report post Posted February 21, 2009 Nice setup. I think you're right about a bit more light in the front but well done! Depth of field is perfect. B- Quote Share this post Link to post Share on other sites
JSzymczyk 0 Report post Posted February 21, 2009 Use your macro, diffuse the flash for up-close, choose a plain background that contrasts well, use some reflected light under and behind, and USE YOUR MACRO. Then play around with exposure bracketing, distance and zoom, and fly orientation. Great thing about digital is that you can fire off as many shots as you want, and see immediately if you like them. Don't forget that a decent photo editing software package can help a lot too. I used to do a lot of 35mm photography, and like all the "serious" folks of that era I used to have the opinion that the photographer needed to manipulate the light to produce the results that were wanted. Now, that is only partly true. Also, don't instantly think that the best fly photos are comparable to pics from a medical manual... i.e. flat lighting, totally flat side-on fly orientation, etc. Those are certainly great for illustrating pattern details and technical tying prowess- but TO ME they don't show much "personality". The number one best tip anyone ever gave me about photography was: Take a LOT of shots, all the while playing around with every setting on your camera and every lighting possibility. I'll add: Take notes, and learn how to use an editing package such as Paint Shop Pro or Photoshop. Quote Share this post Link to post Share on other sites
Houndog 0 Report post Posted February 21, 2009 This was shot using a DSLR, macro lens and a macro flash kit, handheld. I think the P&S version comes close to this, especially if I had paid more attention to the lighting. Quote Share this post Link to post Share on other sites
BruceC 0 Report post Posted February 21, 2009 Even hand held, the detail is much finer, the shadows are more open, ribbing is clearly defined and the overall color rendition is finer. The P & S version is really close but the second shot is the one for me. Bruce Quote Share this post Link to post Share on other sites
Brian Brown75 0 Report post Posted February 21, 2009 Im going to try that idea with the bottle Quote Share this post Link to post Share on other sites