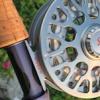
DFoster 0 Report post Posted February 7, 2019 I have been tying on a Xuron vise since about 1980 and decided to upgrade to a rotary about a year ago. Incorporated parts of several vise designs after a lot of thought. Jaws are heat treated O1 tool steel, shank and barrel are stainless steel. ball bearing tig welded to shank for articulation, Delrin for bearing for rotary parts. Decided to try lever that can be positioned in one of 4 orientations instead of star wheel. May change that up in the future. Still need to find the right size "O" ring to put in between jaws to act as spring to open jaws. They self open a little but not much room for a compression spring in there. Used 5/16" #18 for thread pitch but would probably use coarser pitch if I make another set of jaws as faster close up would be nicer. Actually made 2 vises at the same time, one for my son. Used a small milling machine, metal lathe and drill press. I must be doing something wrong with pics and the attachment tab does not sow up unless I post, then go back and edit post unless that is how site is set up? Impressive work! Quote Share this post Link to post Share on other sites
jdowney 0 Report post Posted February 7, 2019 I have been tying on a Xuron vise since about 1980 and decided to upgrade to a rotary about a year ago. Incorporated parts of several vise designs after a lot of thought. Jaws are heat treated O1 tool steel, shank and barrel are stainless steel. ball bearing tig welded to shank for articulation, Delrin for bearing for rotary parts. Decided to try lever that can be positioned in one of 4 orientations instead of star wheel. May change that up in the future. Still need to find the right size "O" ring to put in between jaws to act as spring to open jaws. They self open a little but not much room for a compression spring in there. Used 5/16" #18 for thread pitch but would probably use coarser pitch if I make another set of jaws as faster close up would be nicer. Actually made 2 vises at the same time, one for my son. Used a small milling machine, metal lathe and drill press. I must be doing something wrong with pics and the attachment tab does not sow up unless I post, then go back and edit post unless that is how site is set up? I have a heck of a time posting pictures too. Nice job building a vise, that's not a job everyone can tackle. Out of curiosity, why weld on a bearing? Quote Share this post Link to post Share on other sites
mikechell 0 Report post Posted February 8, 2019 ball bearing tig welded to shank for articulation, Out of curiosity, why weld on a bearing? Is that the ball at the base of the shaft? Pinched in the clamp? Do you ever actually lean the vise one way or another? Quote Share this post Link to post Share on other sites
Poopdeck 0 Report post Posted February 8, 2019 I thought I was the cats meow because I'm making a crude base for my one vise while your building an entire rotary vise that looks fantastic. That's a real punch in the gut. Quote Share this post Link to post Share on other sites
fishfrnzy2 0 Report post Posted February 8, 2019 Wr1nkles, Mike, jdowney, dfoster, thank you. The ball is to lean one way or another. Mostly to change the angle of jaws to give a little better access on small flies. Most high end vises seem to have articulation on the barrel at top of shank but it works so well at the bottom and you can clamp down very solid so it does not move during hair spinning or other hard pulling tying. seemed just as easy as putting it at top. Here is what the new vise is replacing(mostly). It has made many, many thousands of flies over the years. A kind gentleman made the base for me on this one quite some time ago. It is bronze and quite a bit heavier than the ones that were supplied with originals. Speaking of the original Xuron vise, they really are simplicity defined. Quality on some of the later ones though with very rough action i believe cost them dearly. Poopdeck, if you saw the first plywood & 2 x 4 base I made for a Thompson vise that I learned to tie on when first starting you might have the last laugh! Quote Share this post Link to post Share on other sites
jdowney 0 Report post Posted February 8, 2019 Oh, now I get it. Neat feature! That's what I get for reading while at work - extra dense Quote Share this post Link to post Share on other sites
fishinguy 0 Report post Posted February 9, 2019 there are many ways to fold a hackle. this is just another way to do it. no one way is better than another and none of them are wrong a piece of high density foam make a simple hackle folding tool slice the foam with a utility knife and insert the hackle to fold the fibers. make multiple slices for folding multiple hackles helpful for tyers who use folded hackle in their flies. not so helpful for the tyers who dont also useful for folding CDC in order to grab it with a bulldog clip and trim out the stem for use in dubbing loops. Quote Share this post Link to post Share on other sites
fishinguy 0 Report post Posted February 9, 2019 bulldog clip with foam block, aerosol can tubes and small engine gas line for tube flies, hand dubbing spinner (my favorite of the bunch), super ultra mega fast dubbing spinner from a dog nail grinder thing (a battery powered Dremel that dogs are horrified of), and my articulation shank pliers. Quote Share this post Link to post Share on other sites
Poopdeck 0 Report post Posted February 11, 2019 Since Retiring from 32 years of shift work I now have my evenings open so I started attending a monthly fly tying meet up. I like to travel light so I use an old computer bag as my traveling case. What bugged me was taking a vise base and a lamp with a heavy base or a clamp on lamp that wasn't very practical. My traveling vise is my auction bought Regal which I have been less then impressed with the stability of the base. It's probably more my caveman style of tying then the base but I felt the base could be heavier to limit its movement about the table. Being to cold to fish this weekend, I repaired my roof and killed two birds with one stone. I built a new larger base out of 7/16" steel plate and a couple of 3/8" I.D. 3/4" O.D. machine spacers. I ditched the lamp base and attached the lamp to one of the spacers that slides over a rod mounted to the base. Loosen a thumb screw and the lamp is removed for nice easy compact storage in the bag just like the vise stem.I was going to paint it black but I decided to think on that till next weekend. I'm thinking maybe a different color or maybe polishing it out and leaving it metal color. I'm a little worried about glare from the light though so maybe a metal stain to look like a rubbed bronze. I don't know, it will probably end up black.MIKE, CAN YOU ROTATE MY PICTURE! I have no idea why it does that. Quote Share this post Link to post Share on other sites
mikechell 0 Report post Posted February 11, 2019 Done ... nice work on the base. Is it actually heavier than the original? I think mine's made of cast iron ... pretty heavy already. Quote Share this post Link to post Share on other sites
chugbug27 0 Report post Posted February 11, 2019 Nice design idea pd. Quote Share this post Link to post Share on other sites
Poopdeck 0 Report post Posted February 11, 2019 Thanks guys. Thanks for turning the picture Mike. The old base is 4" by 6" and weighs 1.5 lbs. the new base is 5" by 7" and weighs 5 lbs. the old one has a cork bottom but it slides around a lot. I think I'm going to seek out some kind of rubber to glue to the bottom of the new one. Quote Share this post Link to post Share on other sites
rstaight 0 Report post Posted February 11, 2019 The foam drawer liner works great. That's what I have glued to the bottom of my base Quote Share this post Link to post Share on other sites
mikechell 0 Report post Posted February 11, 2019 Wow! 5 pounds! Yeah, that's definitely heavier! And you're welcome. Agreeing with rstaight on the drawer liner. Better still, it's very inexpensive. You could also try putting a thin layer of silicone sealant on the bottom, and setting it on a piece of waxed paper for several days. I don't think the silicone will stick to the waxed paper, and you'd have a permanent non-slip surface. Quote Share this post Link to post Share on other sites
Guest Report post Posted February 11, 2019 That's neat. I see how you attached the vise and light into the spacers but how are the spacers secured to the base? Also where did you get the spacers? Thanks, Dave Quote Share this post Link to post Share on other sites