

Kirk Dietrich
-
Content Count
2,476 -
Joined
-
Last visited
Posts posted by Kirk Dietrich
-
-
One of the greatest things I remember about guiding was putting people on their first redfish on a fly and even a few that was as brother-in-law's, first fish ever on a fly. That is one exciting time! Congratulations to you and him.
Kirk
-
...But if not, once it has hardened you may later find you have a dimple on your body...Great point! I forgot all about those. I often wondered how those happened cause I am uaually pretty thorough when coating the heads but it does happen.
I'm gonna get me some of that Loon stuff one day.
-
Mark, the name On the Mark Flies sounds good.
You have a lot of good advice here and from what I've read several different versions of how a fly tying business should be run. They are all correct for those individuals but are not necessarily hard and fast rules.
Based on what I've read from you about where you're at and what your initial intentions are, I think myself and flyboy have the most in common and in-line with how you'll operate.
So, don't be discouraged by these talks about big dollars in getting started and being buried in orders for dozens and dozens of flies. I was just a few years older than you but I worked in restaurants part time, so I did have a few dollars, but not nearly enough to stock up on materials. Hell, I didn't even have my own tying vise!
A friend of mine's father had a vise he was no longer using and lent it to me. Next, I bought some basic hooks and materials for my own fly tying. Then I had a few people ask if I could tie some flies for them. If I didn't have the materials I needed on hand, I would buy just the materials I needed for the flies in that order, if it meant borrowing a few dollars. With each order, 100% of my tying income went to purchasing more materials until I no longer had the problem, however, I rarely wasted money on materials I didn't need for a specific fly I wanted to tie for myself or others.
As far as orders, it wasn't a do or die thing to start immediately or deliver in a week. Unless a client was going on a trip that he needed the flies for or expressed a specific deadline, which I usually asked about at the onset of the order, I would take my time. ( I know, cringe, shudder, shame on me.) It worked fine for my life style and style of tying and my customers didn't mind. I, like you, was not looking to make a living at it as many of the previous advisers, which are entirely correct in their advice if you are planning on doing a substantial income from this; however, way over-kill for a small meager endeavor such as you are embarking upon.
To make a long story short, I eventually began tying for shops along the Gulf South and wound up employing a couple of women to help fill orders, I also had Orvis pick up some of my flies where I get a small royalty and now I just tie for selected destination fishermen. The wholesale store business was way to much for me so I let that go.
I'm fortunate to have a regular job and income from tying is for my extracurricular sporting activities and other extras for my family. In fact, my 11 year old daughter has been helping me on and off since she was nine years old with some simple patterns to the tune of her making a few hundred dollars. Not bad for a 10 year old!
Good Luck,
Kirk
-
Epoxy is thick but until it sets, it will "run". If it applied really thick it will run really fast. Even applied thinly, it will run and you will end up with a hard blob of epoxy on one side of your fly or another.
Kirk
-
Speiser, here is a link to some great information on dubbings and different ways of applying them. I think the dubbing loop method is explained about halfway down. http://ukflydressing.proboards.com/index.c...4046&page=1
Although I'm sure you can find some videos on Youtube on it too. While you're at it, you can do split thread dubbing that is similar to the dubbing loop. Learning the loop and split thread methods are worth it as they have many applications. Basically, you're making your own chenille so, you can vary the length to make a spiky dubbing that is good for a multitude of bug parts on different flies.
Good luck and can't wait to see the progression of this fly. Don't loose heart if you have a good idea on a fly. I have several flies that took a year or more of trial and error of tying/fishing/adjusting/fishing/adjusting...until I got it how I wanted. There is a design I've been fooling with for over 5 years now and I still can't get it down-pat; it isn't something I work on constantly but its always in the back of my mind and I'll usually commit a few weeks a year trying a different approach.
Kirk
-
Good start, nice shape so far. I have to say though, I don't see any carpet fibers unless they are the underlayment for the over skin? The legs should be easy, after you make your underbody, form a dubbing loop and fill with the carpet fibers and wind over the body, trim the fuzz from the top and pull the skin over and secure with your mono thread leaving the long fibers from the dubbing protruding from the bottom. Or, you could use silicone legs.
Kirk
-
Exquisite in both the pattern and execution of the tie!
I'm gonna ask a stupid question: How is the tag end of the copper wire secured on the head?
Kirk
-
Dietr, every time I see that, I'm impressed. I can't wait to see it in hand! It is exquisitely representative of a hopper. Yet as far as "realistic flies" go, if you tie poppers, it does not incorporate any elaborate tying methods, aside from the paint job, that fall outside the ordinary techniques that anyone couldn't easily make these for themself. Well, that may be an understatement, your paint job is very unique and I doubt I could duplicate that.
I started my foam head poppers and should be finished later in the week.
Kirk
-

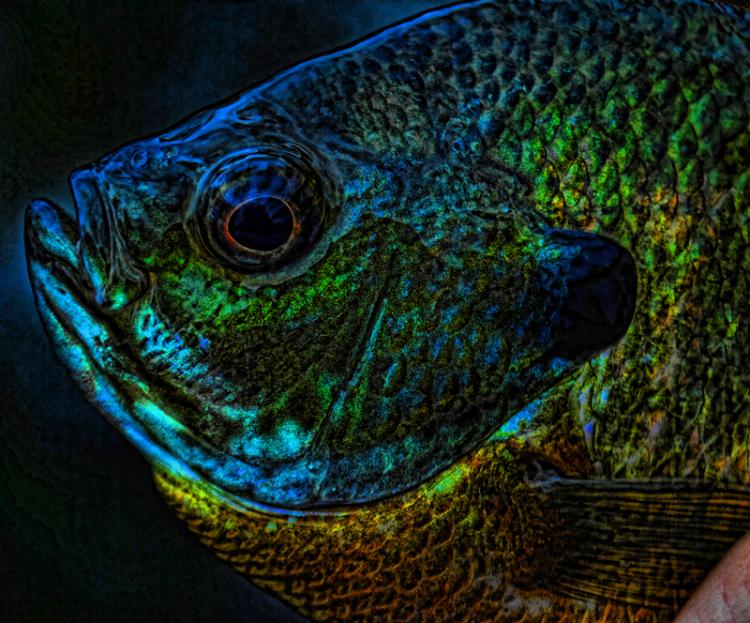
Normally, I don't like intentionally oversaturated pics, but this one I like. It really shows the fish's namesake well, Bluegill. Good job Alex.
Kirk
-
Fyi I only had been tying flies for a year when I started Day5flies.com. I still have customers form my first year buying flies today. As far as covering costs. it is a good idea to know what the cost of materials is then factor how many flies you can tie an hour. I will not normally tie for less then 10 bucks an hour....I have been tying for about 2 years now. You charge per hour?
Flytyer, I think what he's talking about is what I do. You decide how much you are willing to make per hour. You then figure how long it takes to tie a fly so you can come up with a "per fly" or more commonly a "per dozen" cost, then you approximate your material cost also. Speaking of which, when you start making your money, make sure you keep a separate checking account for your material costs or a savings for your profits. I found it helps to keep those separate.
There are flies that I can tie 30 of in an hour, others take 25 to 35 minutes each. The first flies may go for $15 to $20 per dozen, the latter, I get $75 per dozen.
Also, you'll have to find what is most comfortable or efficient for you. Some folks like me like the assembly line approach where you pull all materials for a set number of flies and have them ready, things such as weedguards, eyes, matched sets of feathers, marabou plumes, etc. Other tiers just go at it and pick up their materials and select them for each fly as they are tying it. When I time a fly, I usually break it down in steps and record each of the steps and then add it up to get total fly cost. It is helpful when tying a fly that has down time such as for glues or paint to dry or steps that can be done assembly line style. Also, I did it that way years ago when I realized I needed to hire a few tiers to help me fill orders but they were not experienced enough to handle the fine finishing aspects of the fly so I had then tie certain portions and I tied certain portions and was able to calculate how much to pay them.
Below is an exerpt from my spreadsheet to show you what I'm talking about. The tying steps without times are for other flies across the top of the spreadsheet that I may have times filled in for.
Kirk
These tying steps are not in order of tying the fly, they are just listed randomly as different flies along the top of the spreadsheet utilize different steps at different times in the procedure.
Time in minutes per 6
PROCEDURE "POPPER/SLIDER"
Bend hooks
Cut weedguards (mono) 1
Cut mylar
Melt mono ball
Tie-in weedguard 8
Tie-in firetail
Nail polish wraps 6
Tie or wrap body
Tie skirt/rubber 12
Select & pair up feathers 10
Tie-in tail or wing 24
Tie-in wool head
Comb-out head
Trim head
Put eyes/paint or marker
Tie off weedguard 6
Nail polish wraps
Tie lead, weedguard, & mylar
Trim back mylar
Shape body (5 min. epoxy)
Epoxy overcoat (1st) 10
Epoxy overcoat (2nd)
Turning cork to shape 8
Draw cutting line on bottom 6
Cut slot for hook 4
Sand hook slot w/folded sandpaper 3
Cut slant face/back 1.5
Fit/place hook in slot 2
Glue head to hook 5
Hand sand/round edges of head 8
Fill holes in cork 6
Hand sand body smooth 7
2 - coats primer 12
2- coats primary body color 12
Paint highlights & markings 12
Paint cup in face 5
Scrape paint off hook eye & shank 8
Total per 6, 180.5
Time per fly in minutes 30
-
Great set up and video. I like the end of the video when you say "what the hell, build your own" and toss the clump of deer hair on the table a considerable distance from the vise base and it dissappears in a flash when you hit the switch.
Great ending.
-
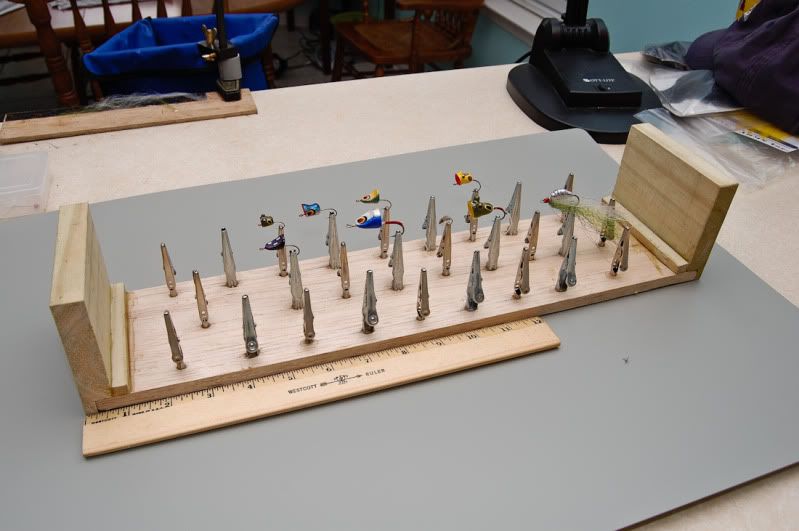
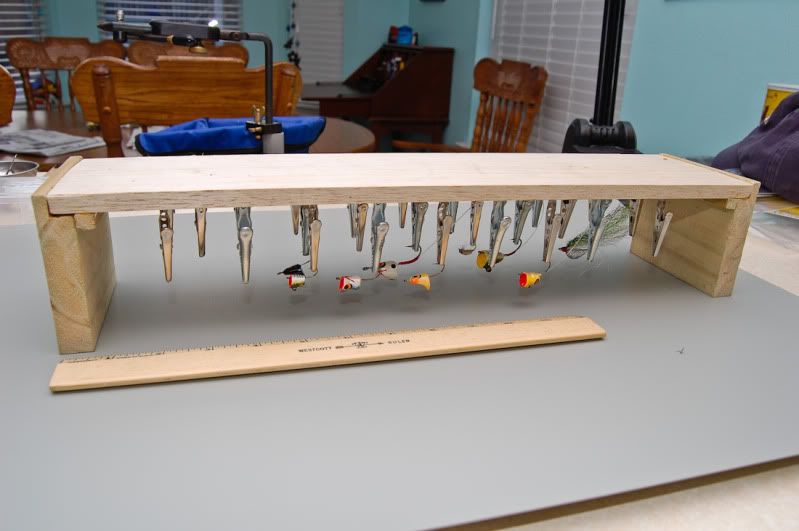
Hey Dart, yeah, it was me. I'm the crazy one that thinks motorized turners are overkill when it comes to flies and epoxy. The more flies you have, the more efficient this set up is. No stopping and starting of turner motor and you can have several of these made up that will allow you to do dozens.
I also use the cheap plastic handled and bristled brushes - I think you get 30 in a bag for a dollar. The trick to a really nice finish is to not coat it to thickly. As said above, 5 minute epoxy yellows. For a top coat, I only use "30 minute" epoxy; never tried the 20-minute one but that would just cut down on your working time.
Place your coated fly in a clip and keep doing one fly after another until the epoxy is to thick to spread thinly.
Flip over and begin mixing your next batch of epoxy. By the time you have it mixed and the next fly coated, the sag of epoxy will have leveled off and you can flip it back over and resume coating/clipping.
This is a picture of how I used to do it before I got high-tech and created the rig above.
If you are mechanically inclined and just have to make a turner cause everyone else is doing it that way, then here is a link to a post with a great bunch of answers about epoxy turners that Dart was looking for.
http://www.flytyingforum.com/index.php?sho...=51954&st=0
Kirk
-
That makes sense because Pat Dunlap of Cascade Crest Tools used to carry an array of colors. Looks like he just has Green, Black and White.
http://cascadecrest.com/index.php?page=sho...t&Itemid=32
Kirk
-
That's okay Stippled, it felt good for a little while thinking I actually said something that made sense. I knew it was to good to be true!
Kirk
-
Damn Stippled, I said that? I don't remember half of what I say, at least this time, it made sense. Now, if you use the 60degree angled jig hooks with the eye turned in line with the hook shank/bend, there is no problem with the paint or running a line cause you're running the line across the front. I should try tying a few more with those Eagle Claw 413s, I think that's the number.
Kirk
-
Without a doubt those will catch. Nice job. What hooks did you use? Looks like the larger ones have a turned donw eye and the small ones a straight eye.
Kirk
-
Bob V, I tried using the Attachment Editor here below the reply box but did not have any luck. It says a single upload can be 100MB and the one I tried uploading is only 6MB so I don't know what the problem is. Must be operator error. If you tell me how to do it, I'll be glad to post the WORD file I created.
Kirk
-
Hot Damn Yellow!! That is a great link!
I copy pasted like someone suggested. It wound up being 198 pages as is. I deleted the left column, reset the margins and converted Table to Text and got it down to 168 pages. Then I rotated the page to landscape and did a two column page and got the document down to 106 pages. Then I went in and reduced the single page sized images 60% and got the document down to 69 pages and 6mb.
Thanks again,
Kirk
-
Beautiful Stippled! The bass are starting to turn on pretty good, those frogs ought to get worn out before long. If you find those orange ones don't get used, I'll be glad to take them for a ride around the pond for you.
Nice!,
Kirk
-
Harold, very good book. Reminds me of my early days of bass/bream fly fishing in the late seventies.
Kirk
-
One of the top guides in the Keys has me tie his tarpon flies on the Gamakatsu SC15 no larger than 2/0, they are strong but thin. Man, those are some good looking flies you tied!
Kirk
-
I know this may sound juvenile but I've got to say it, Dude, you nailed it! Looks great. I like the paint job, the placement of the hook is perfect and I love those legs. Oh, I don't know how the furled furry foam floats but if it floats high and you notice the fish smacking it out the water when they try to eat it you may want to go to a more absorbent furled tail to keep the business end down in the surface film. Something like vernille, I think that's the "chenille" that is kind of stiff and is used for San Juan worms.
Dart, good tips on the hook. Hey, when you're sanding the bottom, what do you use? I've found the cheap nail files to be perfect for sanding popper heads, the thinness can usually fit under any hook gape and the rigidity make the sanding chore a breeze.
Kirk
-
Thanks again.
Dieter, I remember that now. Until your post here, I had forgotten all about that, it seems so long ago that he was sick and passed away.
Kirk
-
Beautiful tie! Just a thought, sometimes you never can tell until you cast them but the rear striped legs may be tied in to low and far up the hook shank, which may result in them tangling/fowling in the hook bend when casted. That is an easy fix if it happens.
Again, beautiful tie, well proportioned and I like the color scheme and profile, it should be very appealing to the fish.
Kirk


Popper Swap II
in Fly Swaps & Contests
Posted · Report reply
I agree with Big Daddy, close it - 12 flies. When I've hosted a swap, I make the flies due one month after closing the sign up. I'm mailing mine tomorrow.
Would you post your address in the first post for those of us that don't already have it. I realize you may have posted in one of the seven pages, but the first post would be easiest to find.
Kirk