
dafunk5446
-
Content Count
352 -
Joined
-
Last visited
Posts posted by dafunk5446
-
-
Yup, those are really nice!
-
I would say the exact opposite, I prefer a slow action rod. Fast rods are very overrated, they are great for casting a mile, but 98% of the time you are unlikely to be casting past 40 feet. I can cast my 7wt fiberglass Heddon into my backing easily, so that argument is almost null anyway. Stiff rods also break a hell of a lot easier then a fiberglass would. You should get an 8ft 7/8wt vintage fiberglass rod. You can get them for dirt cheap sometimes, and you dont have to worry about being delicate with them since they are made of a virtually indestructible material (well...within reason). They are heavier, but your young and wont have an issue. Plus, it will have more then enough power to turn the head of any bass you encounter (I promise, I use my heavy fiberglass rods for carp fishing, and have never felt like I was not in complete control of the fish).
-
Yup, Tenkara is great, definetely not the be all end all, but still very fun, and a functional way of fishing/fly tying.
-
thats a white ghostActually it is a Gray ghost, just very light grey hackles combined with flash make them look white
-
-
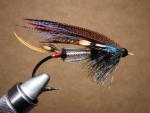
Horrible pic I know....sorry the old lady is away and took the good camera. Anyway haven't seen a cdc loop wing trude-esque emerger I think it should work well.
-
-
I love dee style flies

-
All right, stop posting patterns right now! I am not sure if I like this one more then the Midas, both are great looking flies. Thanks for the pattern!
-
Wow Deeky, Thats a great looking fly! Definetly gonna use those bad boys!!!!!!
-
Just wondering if any of you have used this material before? Is there a similar product you can compare it too? I am basically looking for a angel hair/ wing n' flash substitute for EP style flies. Thanks in advance.
-
So I have been messing around with dying materials recently and thought I would pass some info along to others. There have been some good red quill hatch's this year, and enjoying attractor patterns I thought I would dye some super reddish quills. I am by no means an expert at this, but anyone can do it. It just takes some practice to dial it in, play around with these directions and have fun. Make sure you use a glass container for this. If you use plastic it will absorb the dye.
Step one:
Strip a LOT of quills in preparation for this. I used a cheap pack of saddle hackle for this. Grab the tip of the feathers and remove all the feather barbs from the rachis. After you have done this, take a pair of hemostats and clamp the base of the rachis. Submerge this material to be dyed in hot water with a bit of dish soap. This will make the dye take easier, and clean the material.
Step two:
Grab a mason jar and fill it with water, about 3/4 the amount to completely submerge the material to be dyed. Next grab some packs of Kool-Aid. You need quite a bit because as the material absorbs the dye, the solution will become weaker. Always use more then you think, for a large mason jar I used 8 packs. As you can see I used a few different packs of kool-aid to get the color I wanted. You want to be careful mixing the colors as they dont really follow the color wheel style of mixing. The next step is adding an acid to "burn" the dye into the material. Grab a jug of vinegar and add the other 1/4 of the volume needed to submerge the material.
Step three:
Mix the solution, and microwave for 2 mins. You want the mixture to get really hot, so be careful when removing the solution from the microwave. The heat and vinegar are what actually set the dye in the material. Once this is complete, rinse the material to be dyed under warm water to remove any of the soap. Then submerge the material in the solution, and swirl it around for a bit. How long it takes for the material to absorb the dye is dependent on a lot of factors. Temperature, amount of vinegar, amount of kool-aid, and how long you soaked the material before hand. So check frequently to ensure you get the color you want. The quills absorbed the dye in a few seconds, while a previous dye job took an hour to get the color I wanted. Also remember that the color will be darker when wet, and lighter when dry.
Step four:
Once you reach the desired color rinse the material thoroughly with warm water.
Step five:
Thoroughly dry the material before you through the mix away to ensure you have the correct color. As you can see you can get some pretty cool colors from this method. Here is the final result of the quill dye job, and a white India cock neck that I dyed a silver doctorish blue. I used iced blue raspberry for that one.
Hope this helps some of you!
-
Not sure if it is "purple haze" or not, but I am sure a purple SLF or ice dub would do the trick.
-
Lazarus
-
Jan hit the nail on the head, thanks for the comments guys!
-
Kate 3/0
-
John and dafunk, great flies from both of you! Are those your first fully dressed salmon flies funky?Yes those are the first three I have tied.
-
Some more flies tied over the last couple days, starting to dip my toes into the classic salmons, which I am finding out is a whole new world lol.
-
I agree with Mike's suggestions. The tail should technically be a tad longer, bout the length of the shank. What I have found helpful when judging wing width is to use a hook of the same make, model, just one size smaller, and use that to separate the proper width of wing material. Obviously you will need to adjust where on the feather you take width from. As I am sure you have noticed a hook gap width at the tips is very different then at the base of the barbs. Just keep at it, and you will figure out what works for you. Also get a good book, like Bergmans "Trout" or even Dave Hughes Wet flies book.
-
Humpy by far! Super buggy, floats like a cork, doesnt specifically imitate anything but works almost always, at least in the Rockies. My close second would be any of the Wulffs.
-
I concur, a very good book indeed. Shane has some great patterns, his biot nymphs are killer.
-
Under-lining is typically used when casting long distances is required. For those who do not understand the mechanics, fly line weight designations are determined by the first 30 feet of a fly line. So when you cast a 6wt, in theory, 30 feet of line is what is needed to ideally load the rod, as stated by the manufacture for that specific rod/action. However, once you get more then 30 feet of line out, you are "technically" overloading the rod, because of the increase in line weight. So if you underline, you will essentially not hit the required weight to "properly" load the rod until you are at 60 feet. Basically a rod can handle 3 line weights, which is why a lot of old rods where labeled this way. Take a moderate action 6wt for example: 6wt line=moderate action, 5wt line=med fast action, and 7wt line= slow action.
Example of when to over and under line a rod- your fishing a 5wt for trout, and the 15ft casts you are making fail to load the rod properly, switch to a 6wt line and the rod will load and thus transfer more energy more efficiently to your line. You are fishing your 8wt for bass, and find the rod powers out 10 feet short of where you need to cast due to the weight of the water logged bass bug and line, switch to a 7wt and you will have to adjust your cast so you dont OVER shoot the area.
This is a significantly dumbed down explanation, and not to be taken word for word, just for illustrative purposes for those who do not understand over/under lining rods.
-
LMAO!
Jan, I am so envious, I have the regular HMH Standard, but yours is way better! How much did it run you? Looks to be some crazy new allow? Are all the jaws different colors for quick visual reference? Where can I get one? Seriously I need to know!
-
Finally got out for the first time this year, first trout and first on a fiberglass rod, seriously nothing better then that!


North Platte- Miracle Mile/ Grey Reef
in The Fly Tying Bench
Posted · Report reply
I havent fished there this year, but I would recommend contacting some local fly shops.
I would definitely recomend checking out these reports and/or giving them a call:
http://www.laughinggrizzlyflyshop.net/Reports.html