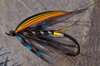
CharlieD 0 Report post Posted March 12, 2008 People always seem to be looking for tying instructions for a string leach so I decided to take a crack at a tutorial on how I tie them. Keep in mind that this is not the only way and there are other good ways to tie them, but this is the one that I like to do. Start by cutting a strip of rabbit fir to a length of about an inch shorter than you want the fly to be. In this case about 5 inches. I like to use magnum cut rabbit strips since they are a bit fuller than the regular ones and we are tying a rather large fly. Next, secure a small section of micro tubing in your vice. Split the rabbit fir on the strip approximately one and one half inches from the front of the strip, lay it on top of the tube and tie it down. Secure the thread with a whip finish and apply some head cement. Remove the tube from the vise and trim the tube on both sides close to the tie in point. Repeat this process about one and one half inches from the first tube. Next, snell a hook to about ten inches of some dark colored line. In this case I used an octopus hook and 50lb. gel spun line. Thread the line through the tubes on the rabbit strip. Next, rotate the head of your vise about 90 degrees and secure a Waddington shank in your vise (I like to use the 20mm size for this type of fly). Secure the turned down eye of the shank in the jaws of the vise. Thread the line with the snelled hook through the turned down eye and secure it to the bottom of the shank with the hook extending about five inches back past the rear eye of the Waddington shank. Thread the remainder of the line through the front eye of the shank, fold it back on top of the shank, bind it down and trim off the excess. Next, secure the front end of the rabbit strip to the back of the Waddington shank (at this point you can tie in some type of flash if you like). Tie in some lead eyes to the front of the shank on the bottom side. Tie another rabbit fur strip to the back of the shank, wind it foreword and tie it off. At this point you can finish the head and the fly is complete. Quote Share this post Link to post Share on other sites
Guest Report post Posted March 12, 2008 Charlie, Wonderful tutorial!!! Good to see you on the forum, it has been awhile! Quote Share this post Link to post Share on other sites
CharlieD 0 Report post Posted March 12, 2008 Thanks bro! been out of circulation for a while. Quote Share this post Link to post Share on other sites
cruncher 0 Report post Posted March 13, 2008 Super great post. I've seen other examples but this is very clear and thorough. Nicely done. Now the problem is, what weight rod do you use to fling that monster? I guess it's all proportional and you can tie smaller versions for a 6 wt setup I guess. Quote Share this post Link to post Share on other sites
CharlieD 0 Report post Posted March 13, 2008 cruncher, They can be a bitch to cast when they are wet. The 5 – 6 inch version shown is usually attached to one of my 8 or 9 wt. spey rods. And yes, you can pair them down a bit for different situations. Quote Share this post Link to post Share on other sites
letumgo 0 Report post Posted April 1, 2008 Oooo, how did I miss this one?!? This looks like a wonderful fishing fly, Charlie. I haven't seen you on the site lately, but I've greatly admired your flies for a long time. Thanks for sharing the details of how you created this fly. Quote Share this post Link to post Share on other sites
St Croix Boy 0 Report post Posted July 13, 2008 Where do you find Waddington shanks? Quote Share this post Link to post Share on other sites
letumgo 0 Report post Posted July 13, 2008 Do a Google search and you should be able to find a source. You could also visit your local hardware store and pick up some cotter pins to use. Quote Share this post Link to post Share on other sites
St Croix Boy 0 Report post Posted July 14, 2008 Thanks i did, and found some! Quote Share this post Link to post Share on other sites