siestafred 0 Report post Posted March 29, 2009 A new addition to the fly pattern database has been submitted by siestafred: Foam Caterpillar Quote Share this post Link to post Share on other sites
siestafred 0 Report post Posted March 29, 2009 This fly is just for fun. I have no idea if it'll work or not, but I know that similar Inch Worm patterns can be very successful. This one is 1 1/2 to 1 3/4" in length. Comment appreciated ! Cheers......Fred Quote Share this post Link to post Share on other sites
Guest Report post Posted March 29, 2009 Nice looking tie. I bet it will catch fish too. Dave Quote Share this post Link to post Share on other sites
john adams 0 Report post Posted March 29, 2009 Nice tie. I bet it will catch fish too.I like to fly foam.I think that the fish will eat it. Quote Share this post Link to post Share on other sites
CoachBob 0 Report post Posted March 30, 2009 Read the instructions. Still trying to figure out how you got the hackle only in the indentations. Quote Share this post Link to post Share on other sites
BigDaddyHub 0 Report post Posted March 30, 2009 i have a co-worker who ties a similar pattern in pale yellow and white and, believe it or not, sinks it with BB shot to bounce it in the bottom of riffles for channel cats....he claims it's a great pattern when the catalpa worms are moving along the Salt and Dix Rivers here in KY....I just love working with foam! Great looking fly! Quote Share this post Link to post Share on other sites
smallieFanatic 0 Report post Posted March 30, 2009 Neat pattern! Nice tying Jan Quote Share this post Link to post Share on other sites
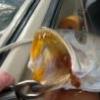
siestafred 0 Report post Posted March 30, 2009 Still trying to figure out how you got the hackle only in the indentations. Ok Bob, I'll try to make it more clear. Attach thread loosely to the needle. Too tight and your body won't slide off. We'll be moving left to right here. Attach the foam to the needle with a small section which has been tapered down a bit. It may help to add a half-hitch. Move the thread to the right on the needle. Attach the hackle feather with the stem to the right and the feather pointing left. Then bend the feather back over to the right so that when you wrap the first body section you are actually going to wrap over the feather. Once the first section is formed (not too tight) you can then pull the feather upright and it'll be in position to wrap in the groove. I did 2 wraps, then 1 or 2 thread wraps over the hackle to secure it, then pulled the feather to the right over and then under under the needle. The thread gets moved right also into position to start the next section. Do 4 sections on the needle, tie off then remove from the needle. At this point I added a drop of Zap a gap to the first tie on section to hold the wraps. Then I trimmed it a bit. You can see what I mean on the right end of the fly in the picture. ( I turned the fly around for the picture, it was actually tied from left to right.) From here you mount the body on the hook and continue the process. I hope that helps......Fred Quote Share this post Link to post Share on other sites
CoachBob 0 Report post Posted April 1, 2009 So the unwrapped hackle, that is going from indentation to indentation, is inside the foam? When I've tried these types of flies in the past, there is hackle in the grooves and hackle between the grooves when it moves to the next groove. Doesn't look very good. Never thought of passing the hackle and thread inside the foam. Sounds tricky but workable. or do I still misunderstand? Quote Share this post Link to post Share on other sites
siestafred 0 Report post Posted April 2, 2009 Yup, although as you can see from this top view photo I have some work to do to get it neater. As I do more I'm getting better at it. Quote Share this post Link to post Share on other sites
siestafred 0 Report post Posted April 2, 2009 For some reason I can't seem to be able to post the photo here. I'll keep trying later. Quote Share this post Link to post Share on other sites
siestafred 0 Report post Posted April 2, 2009 Ok, I added the "top view" photo to the pattern page as an "Additional Photo". Quote Share this post Link to post Share on other sites