Bryan Wright 0 Report post Posted November 24, 2010 So I have a nice Nikon D3000 I love it. It takes beutiful pictures. Has all the manual settings I could want. I can set it up to take close ups and have the appeture set to a high number so the backgroung goes black. At first I thought this was the coolest thing but now I see that I really need a better way to get a good background color. The pics are just coming out too dark. So how do you guys get such good pics? Do you have a light box set up or something? Do you use a tripod? Do you hand hold your camera? What settings do set your camera to, to get true to life colors? I know this is a lot of question and I hope someone can answer them. If not I will keep experimenting and see if I can't reproduce some of the great pics I have seen on here. Quote Share this post Link to post Share on other sites
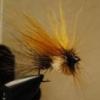
Threshershark 0 Report post Posted November 24, 2010 Macro photography is a whole different paradigm but it's not too difficult to pick up. Here are a few things that will help a lot: 1) Use a tripod 2) Trigger the shutter with a remote, or using the timer. Your timer can be set in the camera's menu down to a 2-second delay and works well in a pinch - but a remote saves time. The focal plane is so thin at macro distances that the slightest bump of the camera by pressing the shutter release with your finger can effect sharpness. 3) Use a SMALL apterture. Again, you are already working with a very thin depth of field due to the distance from the lens to the subject. Unless I am trying to achieve an out of focus effect, I never shoot macros at anything less than f/16 and prefer f/22 or f/32. Shoot on Aperture Priority, and let the camera select a shutter speed. 4) Ideally you'd have a macro lens. If not, your kit lens will produce good results (although not 1:1 lifesize). 5) Lighting is key. There are all manner of ways to set up macro lighting. You can use an off-camera speedlight like the SB400, connected to a flash extension cord, build/buy a light box, or any number of other options. I've always gotten very good results with a DIY lightbox like this: http://strobist.blogspot.com/2006/07/how-t...oto-studio.html Instead of using a strobe as shown, I just use a pair of desk lamps with NVision daylight bulbs. Of course if you have a speedlight, they are great. I use a SB400 diffused through a small softbox quite a bit too. 6) Turn off Auto-ISO. Your camera will have a tendency to increase ISO when using very small apertures indoors. Turn the auto function off and make sure your ISO is set to 200 or lower. For backgrounds just do whatever looks good to you. Posterboard or foam core is easy to handle and inexpensive, sheets of formica are nice too. You can also visit the local fabric store and find anything under the sun. The nice thing about toying with a speedlight is that the gear is portable and you can use the same techniques on real bugs that use at the vice. This image was taken using a SB400 speedlight on a flash extension cord, with a cheap Sto-Fen omnibounce diffuser. Those are the basics - it takes some experimentation to dial things in exactly the way you want them - but with the right fundamentals you can save yourself a bunch of time. Have fun with it. Quote Share this post Link to post Share on other sites
rockworm 0 Report post Posted November 24, 2010 I don't see how a high aperature number could make the background go black. It will increase your depth of field so that it will be easier to get your whole fly in focus. If you want a lighter background you will need to place something behind your fly which is the shade you desire. You will also have to illuminate it. And if you want the background to be in focus (ie- its a picture or a pattern) you will have to place it (probably very) close to the fly. For a backdrop I use a black cloth stretched over a sheet of cardboard placed several feet behind my fly. I don't worry much about its illumination since I want a dark background. And I also use a high f-stop, plenty of light, and relatively long exposure time. My camera is a Powershot G2, with a close-up lens and I use a tripod and two or three spotlights. There have been other posts regarding this problem. You should do a search for them. (Some are lengthy!) Quote Share this post Link to post Share on other sites
Kirk Dietrich 0 Report post Posted November 24, 2010 As Thresher said, lighting is key. While I often use a tripod and shutter release, I don't always especially if I'm just shooting one fly. If I plan on doing a bunch, I'll set up the tripod, etc. I use my Ott Light and an off camera flash bounced off the ceiling, see image below; I have the SB600 and SB400 from Nikon. Sometimes, I use the diffuser as shown, other times, I don't. Almost always though, I have to bump up the power output of the flash when bouncing or using a diffuser. Never got around to a lightbox as I am satified with the results I'm getting without one. I like a neutral background, this greenish/grey in the pic contrasts nicely on about 95% of the fly colors I tie. I usually shoot between f/8 and f/22. I like to shoot a relatively high ISO to ensure good color not going higher than 400 on my D300. I've been getting in to the practice of putting a grey card in a test shot so that when I post process in Adobe Lightroom, I can adjust the white balance to obtain the proper color representation. Kirk Quote Share this post Link to post Share on other sites
Bryan Wright 0 Report post Posted November 24, 2010 the high fstop with a fast shutter speed and a good flash is what makes the background go black. When taking a picture of a flower with lots of color it looks pretty cool. Some of the flies that are colorful look good too. The problem I was having was with the darker flies getting lost in the blackness. Great instructions by the way. Now I have a weekend DIY project to tackle. Thank you. Quote Share this post Link to post Share on other sites
carlp5351 0 Report post Posted November 24, 2010 Here are a couple more good links to macro photography http://globalflyfisher.com/gallery/digitiz...igital.html#res http://www.coloradofisherman.com/forum/ind...95457#msg595457 carlp Quote Share this post Link to post Share on other sites
Bryan Wright 0 Report post Posted November 24, 2010 thanks for all the great replies. Sounds like the first thing I need is a better flash. something I can diffuse or at least bounce. Oh well one more thing for Santa to bring I guess. Quote Share this post Link to post Share on other sites
WYKnot 0 Report post Posted November 29, 2010 You have gotten some great tips Bryan, a couple of things to think about: Depth of Field (DOF) is extremely limited under macro conditions, once you get to 1:1 or greater magnification, DOF is paper thin. Be sure your fly is parallel (same focal plane) as your camera sensor in order to capture as much of the pattern in acceptable focus as possible. The same holds true is you plan to take photos of tying steps; keep mateirals in the same plane if you want them to be in focus. Try mounting a hook in your vise and vary the camera angle until you get both the eye and point in crisp focus. It is a good way to learn about DOF, camera angle, and lighting. If critical focus is your intent, try shooting in aperture priority mode. I also shoot from a tripod and use manual focus. I have found a sheet of medium blue closed cell foam makes a handy background: easy to manipulate in Photoshop, user-friendly to most auto-exposure systems, and provides a uniformly lit surface. Experiment, be creative, and have fun! Quote Share this post Link to post Share on other sites