Graham 0 Report post Posted March 11, 2005 Hi JRG, Thanks a lot for the info! I forgot to mention, the mayfly abdomen can be tied without the wire. Just pull the foam back and wrap around it, keeping the tails centered inside the foam, basically an Oliver Edwards technique. I wanted to add the wire, worked great inside Caleb's fly of the year, allows for easier bending of the abdomen without the tendence to re-straighten. The Hex below was the one I sent in for the contest, has no wire inside the abdomen. The entire body is two strips of foam, even the eye's. Graham Quote Share this post Link to post Share on other sites
The Junkie 0 Report post Posted March 12, 2005 Graham, great job and I know weve talked about this in emails in the past, but if possible, can you post a tutorial on start to finish with the legs. I cant even tie bad legs in properly. These damn bug legs are screwing me up in the worst way. Quote Share this post Link to post Share on other sites
Graham 0 Report post Posted March 12, 2005 Hey The Junkie, I finished my second Hex Mayfly for this months challenge, couple pics below. I used Japanese Nympg legs on both of these fly's. I'm just starting to learn how to use this product. On the seconf fly I bent the legs without heat, using fine tipped tweezers, then later put a hot bodkin tip on each joint to heat them, just for a second, sets the joints stiffer. I don't have time today, but soon I'll post pics of making the legs and wings. I took pics of every step tying the second fly. Graham Quote Share this post Link to post Share on other sites
CrustySpinnr 0 Report post Posted March 12, 2005 Here is my abortion....errr contribution. This was THE most aggravating fly I have tied so far. Guess somedays you should just leave the vise ALONE!!! Quote Share this post Link to post Share on other sites
crazy cannuk 0 Report post Posted March 13, 2005 excellent tying boys keep 'em coming!!!! Quote Share this post Link to post Share on other sites
Graham 0 Report post Posted March 13, 2005 Hey CrustySpinnr, Just keep trying, don't rush the fly tying, if it gets frustrating take a break for a while. I really like the picture I took of the two flies on the copper rock but I notice the eyes and head are wrong. Those were the tiniest seed-beads I could find, next tye I won’t use beads for eyes and will try to make the head narrower. I need more practice shaping the legs, and trimming the shape of the wings. I enjoy every step of tying this fly except for scribing the lines on the wings. The next one will be tyed smaller. Graham Quote Share this post Link to post Share on other sites
Graham 0 Report post Posted March 13, 2005 If anyone is copying the pics I posted making the foam abdomen, 26 GA wire and thinner Razor foam seems to work better. I woke up early, felt like tying a bit before the family got up, and started another mayfly, using thinner wire and razor foam, creates a much more delicate looking body. The foam can be trimmed length wise once the core is secured, allows for better body tapering. Quote Share this post Link to post Share on other sites
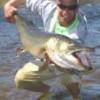
Graham 0 Report post Posted March 14, 2005 Here's a pic of my third try, thinner wire and foam, the head and eye's look better than the last two. I think after a couple more tye's I'll have one ready to add to the database as a Realistic Hex. Graham Quote Share this post Link to post Share on other sites
JRG 0 Report post Posted March 14, 2005 Hey Graham, Hit the American today. Not much was happening. Water was a bit high and cold. No insects hatching, only saw one fish rise and didn't get any strikes. Fished from 3pm to 6pm. My bro did manage a big sucker fish though! Hopefully when the flows go back down below 4000cfs the fishing will be better. Did see about 5 other fisherman and talked with them briefly... all had caught nothing. Jeff Quote Share this post Link to post Share on other sites
Guest Report post Posted March 14, 2005 Graham you are the man! That fly is killer.The wings look like you pulled em off a real Mayfly. Great work to say the least Brent. Quote Share this post Link to post Share on other sites
Graham 0 Report post Posted March 14, 2005 Hey Brent, Thank you, I've been trying real hard to figure out this fly pattern, still a work in progress. The pics below show how I made the wings. I was browsing around a local art store and they had so many different types of clear films it was kind of overwhelming. Here in Burbank, home to Disney, WB, ABC, NBC, etc, the local art stores are huge and have everything imaginable in the way of artistic stuff for the studios. Using my fingers, I felt many of the clear plastic film products, and decided to by a notepad with 12 sheets of acetate alternative, called DURALAR. First, using my laser, I printed a page with different sized mayfly wings (drawing posted earlier on this thread) and placed this into the notepad, underneath the first sheet of clear film. Next, I scribed lines onto the film using a sharp tipped bodkin, tracing the printed lines. Then colored over the wings with a brown permanent marker. For the first fly I used black marker, this fly used brown. The third fly, with the best wings so far used yellow, then a lighter shade of brown. Next step is to wipe off the marker with a paper towel before it dries, removing the color except for in the scribed lines. Next the wings need to be cut out and I like to paint them with clear acrylic varnish mixed subtly with some coloration. To make the coloration I put some varnish into my little plastic pallet, then ONE drop of pearlescent yellow and a TINY pinch (using fine tipped tweezers) of Aztec Gold pearlescent pigment powder. Mixed this up with a super fine tipped brush and painted both sides of the wings. Should be a dry in less than one hour, leaves enough time to make up a bunch more wings for tying with later. Next, tye on the wings. Hey JRG, Thanks for the river conditions and info. How close are you fishing to downtown Sacto? I've heard Goethe Park is worth a shot? Next step is to start tying them onto the hook. Quote Share this post Link to post Share on other sites
CrustySpinnr 0 Report post Posted March 15, 2005 Absolutely incredible! I'll have to check the stuff out. It's hard for me to really tie much(kids),but I try. Thanks for the advice Graham and also for the info on the new material. Quote Share this post Link to post Share on other sites
Graham 0 Report post Posted March 15, 2005 Hey CrustySpinnr, glad you like it, I think it looks pretty cool, thanks. I was just studying the Challenge pic from CharlieD and see that my coloring is way off, much too yellow. Legs are way too long and a few other things need improvement. I really want to try and make a fly look just like the photo. Next one will be better. Graham Quote Share this post Link to post Share on other sites
fishaholic 0 Report post Posted March 15, 2005 Those are some very nice detailed directions there graham.I practiced with the foam body ones last night and actually ended up with a rather unique looking dragon fly pattern when all was finally said and done. I have to say its been rather fun playing around with foam lately and between you and pujic there I have been having a field day with these patterns.So I just thought I would say thanks for all the information and keep up the good work. Quote Share this post Link to post Share on other sites
Graham 0 Report post Posted March 16, 2005 Here's the one I did last night, less yellow, shorter skinnier legs, getting better. I don't know why the camera shows so much red color in the brown, the fly isn't that reddish. I also tied on an extra set of tails, and then pulled them forward while segmenting the foam, trying to get the lateral line the Challenge fly has. I don't think I can do much better than this, when I look at Paul Whillock's mayfly, I just don't know how he does it, everything's so perfect, truly amazing. Graham Quote Share this post Link to post Share on other sites