

James Daly2
-
Content Count
30 -
Joined
-
Last visited
-
I have a renzetti traveler too, but I have the knob tightening jaws and not the lever. Are the lever that much better? Big J, The cam lever is the jam! I'll never buy a vise without one again. I think it holds stronger.
-
I've beaten around the idea of invest hundred's of $$'s on a vise, but then again my Renzetti Traveler has served me well for years. What's the point in spending $500 on a vise? Just to say I have a vise? This thing, I've stripped the knurled screw twice, but it keeps holding steady. Great vise. I've been tying on a Thompson model A lately too. -Jamie
-
Size 4 brown over orange, green over white, and black over brown clousers. A size 6 6 xl hook with an olive zonker strip tail and then a cross cut olive strip palmered up to the eye. The entire hook shank should be wrapped with .015 lead wire and use a 7 weight. Any hellgrammite pattern. My smallie box is stuffed with clousers, that rabbit fly and helli patterns. That's it. Oh yeah, a couple of red/white poppers for dusk. Edit: I just read Bryan's link for the Tanneycomo sculpin. Never knew it had a name. I've been tying that olive zonker/crosscut without eyes for a long time and thought I was special. LOL! I was under the impression it was an original thought on my part, yet again proven that I'm an unoriginal Ba$tard.
-
Brilliant! I love it! I actually laughed out loud when I saw that. I like the one's I posted up earlier. size 20, mallard tail, olive hare's ear and dragon fly olive slf 50/50 dubbing, copper wire, black wool for the wing case and a 1.5mm tungsten bead. These you can only tie at a rate of around 20 per hour.
-
Tying Marabou spey style? Do you mean actually spey style, as in the River spey in Scotland? Or are you talking Pacific NW "spey" style? Traditional spey flies primarily utilize bronze mallard as a wing material, along with rooster coque for the hackle, sometimes employing heron for a hackle as well. The finish fly had a very crustacean appearance and that was one of the theories on which the originators based their construction. In an american "spey" style, they utilize longer fibered hackles for hackling and basically tent the body with the wings. It's not really spey, more speyish. In reference to Marabou, you need to make sure that you have the appropriate look. In the golden age of Classic Salmon Flies, there were a specific set of patterns coined "eagle" patterns. They were called so because, you guessed it, they used eagle plumes. Eagle looks exactly like marabou, except the tips are very fine and not nearly as "fluffy" as a bag of strung marabou. Make sure you find these type marabou (you may get 2 or 3 out of a bag of strung marabou). If you don't, the fly will look like a big blob of fluff. Also, make sure that it has a thin, flexible stem. This will make it easy to control, as well as cut down on bulk. You can run a razor down the back of the stem to try and make it more pliable, but you have to have a steady hand. To wrap it, you want to tie it in tip first and work your way up leaving a descent space between the wraps so the fly isn't so full. As well, you'll want to counter rib it with either a metal wire or tinsel to protect the fragile stem near the top of the feather. (It tapers to thick really quickly). I'd be more than glad to help you further, if you want to shoot me a PM. I'm kind of a nut case when it comes to classic flies and those style (Check the Avatar). I'll try to dig through my bags of 'bou to see if I have something that can make the grade and I'll post a step by step. It's really easy, but it's easy to over do it. Regards, Jamie
-
Greetings all, Here's an amalgamation of different styles. I tied cotterpin flies for steelhead and have been big into articulated streamers as of late. On the cotterpins, I would tie a stinger hook with a tuft of arctic fox, marabou, etc for that extra "life". This is kind of like those, except a tandem hook. Kinda Galloupish, kinda Pacific NW. It's got vicious movement (I did a tub test, as I'm yet to fish it). Simple steps and doesn't need to be the tidiest of ties. Here we go. I've used an Owner size 6 for the stinger. Tie in a tuft of Olive Ostrich and set aside. I used 30lb spider wire to hold the stinger. Make the loop (If the hook is an up eye) so that the hook lies straight. This is the view from under the shank. I've used a size 6, 6xl streamer hook for the main body. Turn the hook over and tie in your eyes with x wraps on the bottom of the hook about 3 or 4 eyes back. Starting at the bend tie in the spider wire and work up to around a hook eye or two from the eyes. Tie in black chenille and leave the tag end of the spider wire. (You'll re bind these down for durability). Wrap the chenille to the bend, tie off. Make a dubbing loop and work the thread back through the chenille to the original chenille tie in point. Take a good bunch of Arctic Fox fur and pick out the majority of the guard hairs. Enough so that you have a few, but the majority of the bundle is that nice fluffy, full of movement fur. Spread the fur so that it is the thinnes at the back and make it progressively thicker as you reach the eyes. Treat it just like hackling a wooly bugger. Four or five wraps should do through the body. The density at the head will give it some of that forward bulk sculpin look. Select a chinchilla rooster coque feather (Side tails of a barred rooster) with long fibers. It's like schlappen, only longer in fiber length. Give 2 or 3 wraps for a collar. Tie in 2 strands of brown barred sili legs. Stack Olive sculpin wool. 3 bunches on top and 2 below. Brush out. Trim head to shape and trim sili legs to length. I trimmed right to the eye of the stinger hook. Hopefully a pig smallie smacks it for you. Or better yet, a 24" brownie. Thanks for looking!
-
Greetings all, I went from tying 5" articulated behemoths to these little BWO nymphs. They're size 20-22? They're tied on vintage mustad hooks, so I'm not sure if the sizing is up to date. They sure look smaller than a Daiichi 20. Anyways, I was out on a local stream and was perplexed by the fact that the sulphurs, march browns, iso's and cahill nymphs had been absolutley smashing the fish for 2 weeks and they just stopped working, like a switch got flipped. The hatch has been prolonged by the variation in weather patterns and we've seen some very strange bug activity in recent weeks. Well, I figured I would go small. So, I reached into the box and to my surprise, one bead head bwo left. Ah well, it'll work. I put it at the point and was running a iso above it. Wouldn't you know it, first drift, wham, 15" bow. Bingo. I forget to mash the barb, so I take I my forceps and broke the hook point off. Nice one, Daly. Pissed. Needless to say, I still took fish, but I know I would've taken a ton more with a smaller fly. A lesson learned for me and the reason why I'm focused so much on fishing flies now, as opposed to presentation flies. A simple pattern: Tail: Bronze mallard. Body: Olive hare/SLF custom blend, Thorax: Same, Wing Case: Black Berlin Wool. Bead: 1.5mm Gunmetal Tungsten. I tie them thorax bead, as well as head. They just won't take the bead head sometimes. I'm not one to add the little tufts of flank for the legs. I figure it's a waste of time and in riffles, I'm not sure an animal with an IQ of 6 will be so discerning. If anything, I pick out and trim the dubbing for the effect. For your critique and amusement. -Jamie PS: Check out the old forged size 20's! That's got to be one tiny hammer. LOL.
-
A big 5 or 6lb smallie will smack a helly on the swing with the force of a steelhead. Dead drift it, then let it swing out and dangle for a couple seconds. Kapow! Tie a bunch!!! -Jamie
-
Welcom to PA! Glad you had a great time. I feel very blessed and fortunate to reside here.
-
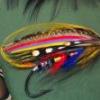
The Snap Dragon
-
I had always trout fished, ever since I was knee high to a grasshopper. It was my way of getting out with both of my Grandfathers. Grandpa Daly was a salty dog and turned me on to striper and blue fish angling. My Grandpa Spence was the trout guru and loved all things freshwater. I am/was truly blessed to have two very engaging Grandfathers. When I was 16, I had got tired of catching trout on spinners, eggs, etc, etc and wanted a challenge. I had always seen flyfishing on tv and found it intriguing. It just so happened at the time, unfortunately, one of my Grandpa Spence's friends passed and his wife gave him Dusty's fly tying stuff. My G'pa, being the staunch night crawler drifter as he was, immediately handed them to me and said here, try this. Well, I tied a wooly bugger, took it to a local creek, flailed it out on what I thought was a cast with my 6wt Sci Angler get up and wham! 10 in rainbow. Done, done and done. Hooked forever. I remember saying to myself, "Are you kidding me, it actually took a fly I tied?". 15 years later, forays into all things fly tying from Salt to Classic Salmon flies and back, material dying, studying old world methods for tying without a vise, anything and everything and I'm still obsessed. I have recently become re-obsessed with trout flies. I probably spent 4 years tying Classic Salmon flies (Which I would suggest to everyone. You'd be amazed what it can do for your technique) and would tie only enough trout flies for the next day's trip. Now I'm hell bent on stuffing my boxes so full that you see fluff and beads stuck out all over the place. Although, through it all, I always kept my smallmouuth box full, I've been fortunate to have a great mentor in Mike Laskowski of Oil Creek Outfitters for around the last 7 years or so and he really helped to push my tying to the next level. It's a great addiction and it's not crack....I try to tell that to my wife all the time. Tight lines and tight wraps, my brothers and sisters of the fly. -Jamie
-
That's twisted! I like it. -Jamie
-
Well, I'm pissed! Screw you all! LOL! JUST KIDDING! Swap away, fellas. I don't think I've been in a swap for around 4 years. Swapping is a definite addiction and to be invited to one would be cool, but I can barely tie a dozen for myself, let alone for 12 others. It's a cool idea though, kinda makes ya feel special. On that note, I would like to invite everyone on here to send me flies, thank you. No repeat patterns either. That'll be 1200 dozen expected by June 15th. Get to work. -Jamie
-
Elk and Moose hair... Need some input..
James Daly2 replied to c-denby's topic in The Fly Tying Bench
Chris, There's no voodoo involved. It's all a matter of selecting the materials that you want to dye based on the natural shading of the material itself. Take grizzly bear for instance, if you get a blond phase patch, the hair closest to the hide will be a dark shade, it then transitions to a blond tip. So, if you dye it yellow, the darker shade will take on an orangish color and the lighter tips will be yellow. Same with deer, elk, etc. some of it transitions from light, to dark and back to light at the tips. A natural shading technique that only mother nature can produce! I just exploit it! -Jamie PS- IF you do get into dying, try mixing different colored dyes. You'll get some pretty wacky colors. Word to the wise, if you are married........don't use the good pots. -
Elk and Moose hair... Need some input..
James Daly2 replied to c-denby's topic in The Fly Tying Bench
If I may chime in on the dye front. Whatever works for you is great, stick to it. But, the need to soak a piece of hair for an hour or two is way too long. All natural furs, feathers, etc are made up of keratin. Keratin reacts pretty quickly to heat. The point of dying in a hot dye bath is that it heats the keratin up to open the pores to the fullest. This allows the dyestuff to enter the pores, thus creating a "lake". That's why you rinse it with luke warm water. It closes the pores up pretty quick and Voila' you've permanently dyed a material. Think of splashing cold water on your face. Your face tightens up pretty quickly, right? The substrate (materials) may or may not need more time to soak in the dyebath. The reason being that it may be a tighter material. What I mean by that is that a Goose quill needs approximately 5x's longer in a dye bath than a piece of Mohair to get the same color. Quills have a lot of oil to shed water and they are a more densely packed keratin. Mohair on the other hand is a wispy, light fur that can pick up color in minutes. Equate it to trying to dye a piece of fingernail vs a clump of hair. The fingernail would take a heck of a lot longer to dye the same color as the clump of hair, but will eventually take the same color. Essentially, you want to soak a piece that you are going to dye in hot water for around 10 minutes and make sure there is dawn dish soap in the soak. Dawn has the highest amount of synthropol available in retail stores. You can buy Synthropol from shops and fabric websites. Its a degreaser/detergent. The reason for the dawn is to strip the oils from the hair/feather/etc. The oils protect the keratin and make dying a lot harder. Once the oils are stripped and the substrate heat to open the pores, it only takes about 5-10 minutes in a dye bath of acid dyes (Jacquard, Veniard, etc) to get a decent color on most hair. Some make take longer, but you can monitor the color and remove it when you hit the right shade. Dying hair is exactly like dying easter eggs. Get some Jacquard Acid Dyes in various shades, heat your dye pot to just below boiling, add your dye amount to reach the desired shade, add vinegar (the acid) and a drop or two of dawn. Drop your piece of fur that has been presoaked in hot water for around 10 minutes and let it sit. For a richer color, after 10-15 minutes, shut the fire off and let it cool to room temp in the dye bath. The depth of color will blow you away. I've dyed all sorts of materials in all sorts of shades using various methods. It really is another hobby, just like fly tying. I've used natural materials (I have a bunch) to dye like the old world masters did. Cochineal beetles (The British Red Coats were dyed using Cochineal), log wood, turmeric, indigo, brazil wood, etc, etc. Acid dyes are a lot easier, as they cut down the dye time by about 2 hours! Anyways, take that advice for what it's worth and have fun doing it! It's a blast and the greatest part is that you can custom dye materials that you wouldn't find in your local shop. To answer the main topic, some areas of the elk hide are more chambered than others. But, for the most part, it will flare nicely. Moose, on the other hand, especially the mane, is more like bucktail and to parrot rockworm makes killer mayfly tails. Here's some pics of feathers, mohair, berlin wool that I dyed a while ago and some deer, rabbit and elk I dyed yesterday. Notice the rabbit color, I let it sit for a very short time in the bath to give it a slight tinge of color. I wanted to retain the natural color, but have a little color to it for a crayfish-ish pattern. -Jamie