
Streamside
-
Content Count
169 -
Joined
-
Last visited
Everything posted by Streamside
-
How far will I go.... ??? Hmmmmmmm.......??? It depends on how bad the urge to stop is and how bad the traffic is. LOL Then there is also that embarrassment of people driving by seeing you picking up dead animals off the side of the road and the bother of cleaning the damn thing. I don't do it very often, but there are occasions and I do carry the tools and implements of destruction to get the job done. Early this season I hit a pheasant one morning on my way to the river. There wasn't a mark on it and it was a beauty, so I threw it in the back of the jeep. Didn't think anything more of it and went fishing for the day. When I went to drive home that evening I opened the door and the smell would have knocked a maggot off a gut wagon. After I was finished barfing my guts out. I thew the bird back on the side of the road and drove home with the doors off. I had to wash the jeep twice and shampoo the carpets. Every now and then I still think I get a hint of it. All that for a measly $7.00 pheasant skin. Haven't stopped for roadkill since Streamside
-
QUOTE (Pujic @ Oct 4 2004, 09:18 AM) Very nice Streamside! Beautiful work as always. We should hook up on the Grand next season! Thanks Nick and sure. Grand sounds good. I wanted to do it this season but never got to it. Where abouts are you located? Streamside
-
QUOTE (mcfly @ Oct 4 2004, 09:00 AM) Step away from the fly rod Streamside Very nice obsession you have there! All these bamboo rod builders are a bad influence on the rest of us. I will not buy a book on bamboo rod building. I will not buy a book on bamboo rod building. I will not buy a book on bamboo rod building. I will not buy a book on bamboo rod building. I will not buy a book on bamboo rod building. I will not buy a book on bamboo rod building. I will not buy a book on bamboo rod building. I will not buy a book on bamboo rod building. i]I will not buy a book on bamboo rod building. I will not buy a book on bamboo rod building. I will not buy a book on bamboo rod building. I will not buy a book on bamboo rod building. I will not buy a book on bamboo rod building. I will not buy a book on bamboo rod building. I will not buy a book on bamboo rod building. I will not buy a book on bamboo rod building.[/i] It wont help Streamside
-
QUOTE (Carl @ Oct 4 2004, 02:11 AM) Awesome Streamside. Absolutely awesome!! I've got a newly finished 3wt that won't see the light of day until spring. I hope it has the character and stamina of your Grand Finesse. Care to share her taper? Thanks Carl, appreciate the complement. I am also very impressed with the craftmanship you are putting into the FTOTY nodeless prize rod. Very nice work indeed. Also the way you presented this project with all the interactive polls was a very good idea. Someone is going to be very happy. You will have to send me a pick of that new 3wt. Love to see it. I just ordered all the parts for my new 1 wt I'm making for next season. QUOTE Care to share her taper? I knew you where going to ask me that question. Please PM me on that matter. Streamside
-
Last winter I had built myself four new rods for the up coming season. A 6' , 1 pc # 4 wt "Paul Young Smidgen" for small stream fishing. I actually built four of these sold two and kept two. A 7' 9" 1/2 # 5 wt 2 pc "H&I Tonka Queen" for high stick nymphing and chuckin streamers. A 7' 2 pc # 4 wt "Arundo" {Simply means cane rod in latin} {my own taper} as a general purpose rod. I built two, sold one and kept one for myself and my specially built ultralight 6' 6" 2pc # 2-3 wt } actually closer to a # 2 wt dry fly rod that I aptly named "Grand Finesse" for when the caddis action got really hot . I had been testing balancing and adjusting my rods all winter long at the local arena until I had them just perfect and couldn't wait for opening day. Man I was like a kid waiting for Santa. Everything was already packed in my vehicle the night before and my check list was checked and double checked twice, but I was still waiting for my Phoenix lines to arrive. They where supposed to arrive that morning but never came. I was sure I was going to miss opener, but they finally arrived 8:00 pm the eve of opening day by coriour. Geeze! talk about cutting it close to the bell! It was a mad rush to get spooled, get the lines greased and worked in and hoping they where the right # wt Everything worked out great and I ended up test casting the lines under the light of the street lamps in our church parking lot at 10:00 pm. The only thing left for me to do was pick a rod off the rack and head out the door the next morning. Pick a rod! Simple decision right??? Hardly, It was kind of windy and I knew better, I knew I should at least be taking a # 4 wt, but I just couldn't get that little 6' 6" dry rod out of my head. I just had to try it out so I grabbed it and off I went and tried not to look back at the rack. When I got to the river, the wind had increased. That particular section of the river is like a bloody wind tunnel. I stood there shaking my head " Why oh why didn't I grab that 4 wt.....?" "Oh well, I'm here now might as well give it a try." There was nothing rising so I slipped on a blood worm and made my first cast. Wow! To my astonishment, that Phoenix DT silk line cut through that wind like a hot knife through butter and it didn't matter how windy it got and It mended like heaven. I never had a single problem with the wind all day and we're talkin windy here.There was actually a couple times when it nearly blew my Filson right off my head. On my third drift just as my fly dropped over the ledge my needle knot slipped below the surface. I instinctively set the hook. That little cane rod bowed over like a rainbow and absorbed everything that fish could dish out on that 7x and I eventually landed my first trout of the season on my new rod. Not a huge fish, only 15" but I was in sheer heaven. If my day had of ended right there I would have went home a happy man but I went on to catch fish all day long. Fighting those fresh feisty early season browns on that little 6' 6" 2 wt using 7x was an absolute riot. Up until that point, I had never had a more fun day fly casting in my life. The next morning I didn't even wait for the alarm. I was up dressed, had breakfast, and grabbed that little rod and I was out the door. This time there was no decisions to be made. I was taking that dry rod and that's all there was to it. To make a long story short, over the next few days I just fell in love with my little dry rod. If someone had of asked me last year, what my favorite setup for trout was, I certainly wouldn't have said a 6' 6" # 2 wt. LOL, but I fished that little rod all season. Not just dries, but nymphs streamers, bucktails you name it. It will cast just about anything with the right leader combo and it will land a dry on the water so gentle it must be seen to be believed. I have hauled 50' casts with the little bugger. The rod has also improved my casting greatly because it is so short There is no room for error. I don't know about you, but by the end of an eight or ten hour day on the water, I start to get awful tired and my casting form gets pretty sloppy. But because it is only 6' 6" long and throws a soft wide loop, typical of cane, your fly is only a foot or two off the water all the time so it tends to make me pay a little more attention where my stops are and keep my shoulder high and use a lot more drift in my forward cast. The only thing I have found wrong with it or don't like about it is if you are wading deep, like half way up your chest, it is too short and it makes it very hard to keep your fly off the water when false casting. Other than that I can't say one bad thing about it. The only other rod that left the rack all summer was the # 4 "Arundo" as a back-up . The only time it ever left the tube was if someone came by and wanted to try it out. I only fished it once all season myself. Every trout I got this season was taken on that 6' 6" # 2 wt "Grand Finesse" dry rod using either 6x or 7x tippet and no.... I did not over stress these fish. I have been doing this a long...long time. They where all released healthy and unharmed to swim another day. The only fish I would say that was stressed out, was my largest fish taken on it and it was actually not a trout at all, but a 6 1\2 lb carp taken closing day on a 7x. I fought him for at least a 1\2 hour and I have to admit he was pretty damn tired, but then again so was I LOL. I could have busted him off at any time, but I just wanted to see if the rod would actually pull it off. Amazingly it never even put a set in the rod. It is undoubtedly my favorite rod. Now my rods are all cleaned and polished and sitting neatly in their rack, reels are stripped and lubed, lines cleaned, dressed and hanging neatly from the rafters awaiting a new opening day and a brand new season. And so it is I bid a fond farewell to another wonderful year of trout fishing on the Grand. Now the only thing left for me to do until the Steelies get here is go through my annual end of season ritual of changing photos in my fly tying desk. Enjoy the eye candy! Peace all! Streamside My "Grand Finesse Amber agate stripping guide Vacume Impregnated Birdseye custom made x long seat and matching reel handle Leonard NS cap and ring hardware. Lamson Litespeed 1 reel "Streamside Grande Finesse" Simple but elegant chestnut silk wraps with matching script. The Fish Last season New fish this season Last fish of the season closing day / 04 6 1/2 lb carp
-
Working on it. Give me a couple of days. May have to tape it again. Hang tight. Streamside
-
I can spin them up for you on stainless steel Partridge Swimming Shrimp Flash Points. I can even give you a mix of sizes if you like. That's not a problem, but it won't be cheap. Your looking at $4.50 each USD. Minimum order of 2 doz. I also recomend if you are going to have this pattern made, that you substitute white or grey rabbit strip for for the Antron wool The Antron or Fentax is far too rigid for such a pattern. The rabbit strip will undulate when you are stripping and give it an almost life-like action if you use a SM 6/32 white barbell at the eye rather than weighting the underbody of the fly. I have a video clip of my baby lobster or glass shrimp pattern in action, but I don't know how to post it to the forum. Let me know Streamside 4.50 USD United States Dollars = 5.68 CAD Canada Dollars 1 USD = 1.26266 CAD 1 CAD = 0.791980 USD
-
QUOTE My take on this issue is that we need to have a fly tying standard color sheet that every fly shop should have that would allow them to relate to the customer what color a material is before they ship it. I have been dressing hooks for more years than I care to admit. I've actually been trying to wean myself out of it over the last couple of years. With the cost of materials and especially hooks and genetic hackle, there is simply no money to be made in it. Not even buying wholesale. Fly Shops today just simply don't buy anymore from the independent tier. And rightly so. Why should they when they can buy at 1/3rd the cost from companies like Umpqua, Integra or Crystal complete with charts, literature, catalogs display racks etc...? It's cheaper for me just to take on their lines and become a distributor of their product than it is to tie flies myself. I don't even bother with shops any more. I now only tie for myself, some friends and a few custom orders for of my oldest private customers. As such I still keep the company name open so that I can buy direct wholesale. Over the years, I've seen dubbing and fly tying material companies and their color schemes come and go. It's no big deal. At the first of the year between Christmas and April all my new catalogs start coming in showing the new lines of products for that year. New colors, new shades new textures,and materials they have dropped from their lines etc..... Any of the reputable companies all have color charts and or full color catalogs that cross reference with standard BCS chart. If you are having trouble buying the right shades / color of dubbing materials you can simply request from any company they send you a catalog or color indexing sheet. Most companies are more than happy to comply in order to get your business. Besides the companies I deal with on a regular basis, I also occasionally bought small quantities from other companies all over the world. Holland, Germany, Belgium, Scotland England, Russia. Even most of these have some form of color charts you can use to cross reference or that cross reference directly with BCS. I have never really had any great color matching problems dealing with these companies sight unseen. I really don't see this as a valid concern in the fly tying industry. Also as Troutbum mentioned, coloring is not an exact science. Many times I have seen color shades and dyelots change from batch to batch. If you are really picky, you pretty much need to have your specimine kit in your hands when you go to the fly shop to pic your colors, which is exactly what I do when I am buying for myself. I take my specinine kit right into the shop and hold it up to the material I'm trying to match. If you see a color that you want, you better grab it, because it may be the very last time you ever see it. Also, another point of interest, you shouldn't be buying your colors for the color they show on the rack. You need to take into consideration what the color will look like wet so you need to picture it one or two shades darker. One of my favorite Companies for dubbing is Scintilla who uses BCS. Over the last couple years I have dealt almost exclusively with two companies. Scintilla and Spirit River. Both have an over abundance of colors, shades, materials and textures to choose from and both have cross referencing charts. For your own personal use, from Scintilla you can buy a beautiful complete 3 ring binder with all 85 of their colors. It comes complete with tying tips and fly pattern index cards for $85.00. That's $1.00 a bag retail. You can't beat that price no matter how you look at it. This should alleviate your color matching dilemma. You will have all the dubbing you will ever use in your lifetime. Hope this helps Streamside http://www.scintilladub.com/dubbing.html http://www.scintilladub.com/supplies.html
-
QUOTE (Pujic @ Aug 16 2004, 12:27 PM) Very impressive Streamside. I have a few of those Ikea boxes, but not nearly enough by the looks of it. Thanks Nick. I find with four boxes I have just enough room to store the materials I constantly use. The rest I just store in roll-outs in the closet.
-
If your refering to the realistic drake pattern, I used badger hair from a shaving brush.
-
Though I don't tie as many deerhair flies as I used to when I was tying commercially, I was quite good and fast at it. I still tie a few mice and frog patterns to get me through bass and pike season. The best tips I can give anyone, is to use the toughest thread you can get. I use a #4 Kavlar round braid. It will cut your hands before ity breaks. I also wet my thread. I have a wet sponge sitting in a bowl of water and I just wet my finger on the sponge and run it down my thread before I make my wrap. Incidently, I do this with all of my whip finishes as well. It acts as a lubricant. Your thread will slide better, Your hair will spin much better and you can synch up your wraps much tighter. It also helps when pushing stacks against each other with a stacker. As for trimming & clean-up, Well..... I still havent come up with a good solution for that yet. Some more of my flies
-
Thanks. The real credit goes to Duffin Boy for his idea to use the Fila storage boxes from IKEA. They are ideal fly storing fly tying materials. I recomend them to anyone.
-
This is my tying station. The drawered storage units are called Fira mini storage chest from IKEA. They are made of birch plywood. You buy it as a kit and put them together yourself. Same as Duff's They hold a ton of materials. The large drawers you can fit up to ten full saddles or a dozen bucktails and the small drawers will hold sixty spools of thead or up to seventy, 4" inch bags of tying materials. The specimen rack on the top and the tool rack on the side, I made myself from 1x3 clear birch to match the birch boxes and I finished everything in 1850 Tung & Teak oil. I just drilled different size holes for different size tools. I have made quite a few of these now for friends and relitives and they just love them. I just finished the one below in wallnut for one of my rod customers. They hold more tools than you will ever need plus forty spools of thread with room on the bottom to store head cement, hair stackers etc:.... I used two old vise clamps to secure it to my drafting table and they double as my fly drying rack by holding up the dowels with a length of bead chain strung between them. Total cost for my entire setup was less than $100.00 CAD I've posted lots of photos for anyone who wants to try to build their own. If you have any questions just ask. John
-
PENNY PINCHIN PROJECTS FOR THE THRIFTY!
Streamside replied to Streamside's topic in The Fly Tying Bench
Thanks everyone. I appreciate the comments. I'm working on a post on how to make your own fly tying tools. bodkins, knit pickers, whip finishers etc: I'll post it soon. You can find the recipe for my Streamside Mantis at Nick's Online Fly Tyer, under terrestrials in the fly box. And guess what, it acyually catches trout! Keep your fly dry John "THE FLY GUY" -
Need a break from tying flies ? Why not spice up that vise a little? The $1.59 Profile, Backdrop Plate. The $3.00 Rotary Handle The $0.00 Waste Basket Modification PROFILE PLATE Want a nice profile plate for your vise but don't want to pay $35.00 + tax. How about $1.59 Sound better? All you need to do is go to your local hardware or building store in the heating and air conditioning section and buy a damper plate. A damper is installed inside a piece of pipe or duct work to regulate the flow. They come in any size from 4" to 12" and you can buy them round or square and they make a perfect backdrop plate. I like using the 4 1/2" pipe damper. I bought mine for $1.59. The whole project cost me less than $8.00 including paint. Step # 1 First remove the ugly butterfly nut that they usually come with and replace it with a nicer looking self locking nut. then trim off the end of the threaded bolt with a grinder or heck saw flush with the nut and sand the end smooth with a dremel tool if you have one or you can simply use a hand file. Step # 2 Drill a small hole in the end of the hand lever the same size as the diameter of the rod on your bobbin rest. Try to keep the fit as tight as possible. Step # 3 Sand , prime and paint your profile plate. Sand your plate and smooth the edges using 220 grit sand paper. You might also want to shape or trim down the hand lever with your dremel, it's up to you. I trimmed down the width of mine to make it look a little nicer. Prime the plate using gray Krylon primer in a spray can. I recommend Krylon. It's cheap, you can get it in little touch- up cans and it dries very fast leaving a nice finish. When the primer is dry, give it a very gentle sanding with the 220 and spray the plate with two coats of Krylon white. Step # 4 Slide your profile plate onto your bobbin hanger and cut a 1/8 piece of black surgical tubing and slide it on your bobbin hanger to hold the profile plate in place. L-HANDLE FOR YOUR ROTARY VISE Want an L- Handle for your rotary vise? Here's a quick easy project. Step # 1 You need to buy a barrel sander attachment for a dremel tool. You can get one of these wherever they sell rotary tools. I bought mine at Canadian Tire for $2.99. Actually I used my old one that came with my dremel tool and replaced it with a new one for $2.99 Step # 2 Take it apart and remove the sanding tube and rubber barrel. What you are left with is your handle. Step # 3 Take the handle from your fly vise and make a little center punch mark in the end where you are going to drill the hole for the handle and using the same size drill bit as the shank of the barrel sander attachment, drill a hole in the end of the handle. I recommend using a drill press for this so you can line it up strait, but a hand drill will work as long as you are careful. Step # 4 You will need a small piece of brass tubing, you can get it at any hobby shop. Cut the tubing slightly shorter than the shank of the attachment. Place the attachment in the vise and heat the end with a small propane hobby torch. Slide the brass tubing on and gently peen the end over. It will peen over very easily once you have heated it. Make sure not to peen it too much or the handle will not turn. Step # 5 Take the screw out of the end of the attachment and slide the shank of the attachment through the hole. You will find that it is loose and that the length of the shank is longer than the width of the handle, so you need to carefully file down the shank until it is just a slightly longer than the width of the handle. Don't file it down too much or your handle will fit tight and it will not turn in the hole. It needs to be just a hair longer than the width of the handle shaft. Step # 6 Slide the handle through the hole and tighten in the screw. There you have it. A new rotating L-handle for your rotary vise. WASTE BASKET MODIFICATION What about that waste basket? Are you finding that it is a reel pain and that it is getting in the way? Why not mount it under the table? All you need to do in the case of a Renzetti vise is grind or file a notch in your C-clamp. It's that simple. Your waste basket will sit under the table out of your way and you can just sweep everything right off the table into the basket. The notch will hold the basket in place, so you can swing it in or out as far as you want without worrying about it falling off the end of the shaft. It's that simple.
-
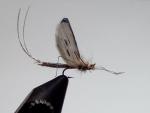
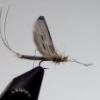
Sometimes just that little color contrast can make all the difference in the world. I have a number of different Brassie and Copper John's that I tie using alternating colors. One of my favorites, a fly I developed about ten years ago is my Candycane Midge. It is tied with a small red glass bead head peacock hurl collar and Hot Orange and Green Ultra Wire. It is a deadly brown trout fly, and continues to catch me many 20 - 25" resident browns every season. I tied one up here quick so you can see it. Recipe: Mustad or Tiemco curved nymph hook # 16- 20 # 00 white Uni thread red glass needle work bead Peacock hurl collar alternating hot orange and green ultra wire Start with a base of white thread, then tie in two pieces of ultra wire, one orange and one green. Keep them tight together and tie them in side by side along the spine of the hook. Wrap your thread till you are just into the bend, then wrap forward again right up to the eye of the hook and secure with a small whip and hang your bobbin on the hanger. Now form a v about 1/4" wide by separating the two pieces of wire with the two pieces of wire between your finger and thumb. By forming the v it will keep the alternate wraps even. This particular fly is much easier to tie on a rotary vise like Law or Renzetti. Wrap the wire forward keeping the v even as possible. Tie off with a whip just behind the eye. Lastly, take two fine peacock hurls and tie them in to form the collar. Wrap the hurls around your thread to give it reinforcement. Tie off with a whip finish and it's done. The Candycane Midge. One of my favorites and a truly deadly fly! Tie a few up and try them and I'm sure you will soon agree. John "THE FLY GUY"
-
Has anyone got any experience with the HMH Exhibition vise package with the three interchangeable jaw sets. I was thinking of buying one this weekend when I go to the states. How quick and easy is it to change out the jaws? I find that both my Renzetti and Law vices do not allow me to do intricate ties in the upside-down position with their stubby little jaws. They always seem to get in the way. As a professional tyer, I have actually always prefered a straight barrel vise over an offset rotary vise for most of my ties. The two I have narrowed it down to are the HMH Exhibition and the Dyna King X1 The X1 comes with two sets of jaws where the HMH comes with three. I can also get the X1 much cheaper at only $229.00 U.S. where as the HMH runs about $550.00. Has any one on the board had any experience with either of these straight barrel vices, and what are your recommendations based on your experience with either vise? Thanks John "THE FLY GUY" AKA Streamside
-
QUOTE (Carl @ Jun 17 2004, 01:21 PM) Since no one else has answered, the book is The River Why by David James Duncan. A very good book. Here's another one: What was the name of the book written by George Parker Holden, originally published in 1920, that was the first work to go into detail regarding the how-to of bamboo rodmaking? It also features a section on making your own real silk worm leaders (very entertaining reading that!). It's an idyllic book on the art of making split bamboo rods... The Idyl of the Split-Bamboo A Detailed Description of How to Build a Bamboo Fly-Fishing Rod by George Parker Holden