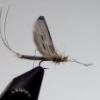
Streamside 0 Report post Posted October 29, 2004 Tying the Henry's Fork Hopper It's mid summer. Hot and sticky, you pack light but still the beads of sweat are rolling down your neck and your exhausted before you make it to the waters edge. Fishing has been tough lately, very tough! The pools are low and crystal clear. If you even hook one today you will be happy. You assume light tippets and tiny flies are the order of the day. You try your best flies for these finicky critters, but to no avail. You decide to move to another pool. As you walk along the bank, insects move through the knee-high grass in a wave just ahead of your every step. Suddenly a gust of wind carries one high aloft over the river. It falls helplessly on the water. After a momentary pause he starts kicking frantically toward shore "SLURP!" then vanishes before your eyes. It's "hopper time again!" One of my favorite mid summer terrestrials is the grasshopper. Sometimes when a trout won't take any thing else, a nice plump smartly placed kicking hopper will be just enough to temp him to rise. Out of all the various hopper patterns, my personal favorite is the Henry's Fork Hopper. I like how it ties, I like the way it looks, and I like the realistic kicking action of the rubber legs. It's a definite trout pleaser. Here is a step by step on how to tie the "Henry's Fork Hopper." Materials Hook : Any medium shank dry Downeydown-eye with a wide gape will do fine. Size can range anywhere from # 6 to # 14. Thread: # 06 Yellow Uni Abdomen: Light tan or white elk . Ribbing: Living Rubber, Yellow Under-wing: Light brown deer hair Wing: Tip of a hen pheasant tail feather reinforced. You can use any of the following: Sally Hanson Teflon nail guard, Krylon Clear Coat spray or Dave's Flexament. As long as it remains flexible. Legs: Living Rubber, Yellow Head: Dark brown deer hair. Indicator: Hot Orange Egg yarn Step. 1 Start your thread and wind back to the point of the hook and let your bobbin hang. Step. 2 Take a 4" piece of Living Rubber and tie it in where you left off with your thread. Wrap it secure up to where the bend of the hook starts. Step. 3 Cut a nice clump of about 1/4" dia light tan elk hair and even the tips with your stacker. Step. 4 Tie it in by the tips. Trim off the access and wrap it tight tapering it off with your thread. Try not to spin the hair. Step. 5 Take your bodkin and holding it at a 90* angle about 1/8" past the bend of the hook, fold the elk hair over the bodkin back over itself on to the shank of the hook and secure it with a couple wraps just to hold it. Step. 6 Trim the ends on a taper and wrap tight to the shank of the hook forming a taper with your thread. It's important to have a nice gradual taper. You don't want to bulk up your fly. Step. 7 Now wind the rubber ribbing forward to form the segmenting and tie off. Try to space segments about 1/8" apart. 5 segments is ideal. Step. 8 Take a much smaller clump of light brown deer hair for the under- wing about 1/4 the size of the first bunch and even the tips in your stacker. Step. 9 You want the under-wing to sit right on top of the fly and not spread out all over so you need to do a bundle loop. Simply wrap your thread once around the bundle of hair to draw it together, then make a second wrap around the bundle and the hook and pull it down tight. Trim the ends and finish it off in the same way tapering it with your thread. Step. 10 Take the over-wing feather you prepared earlier trim it to shape and tie it in overhanging the end of the abdomen by 3/16"to 1/4" The wing should be just wide enough to come half way down each side of the abdomen. Step. 11 Now we are going to do the bullet head and the collar. You want the proportions to be right and you want it to be pleasing to the eye, so we are going to take a measurement. Take a piece of scrap wire and hold it above the fly on a bit of an angle. Just as if it was the collar. You want the tips of the collar to come just past the point of the hook. Put a little bend in the wire the length you want the collar to be. Step. 12 Cut a clump of dark deer hair thick enough to make your bullet head and even it in the stacker. Using your measuring wire, measure the length you need to stick out past the eye. Tie in the clump, trim the ends and wrap it tight down on top of the taper. Step . 13 Now using your bullethead tool, I just use a small piece of soft rubber siphoning hose, gently push the hair back over the shank of the hook forming a bullet head. Secure it with a couple wraps of thread. Step. 14 Take two pieces of living rubber, tie in a knot to form the knee joints and tie one in on each side. Tie in a tiny piece or orange egg yarn for high vis, whip finish, trim off the bottom of the skirt and all the uglies and your done. Quote Share this post Link to post Share on other sites
Guest Report post Posted October 29, 2004 Streamside- Great tutorial and setup on the pics! No doubt you'll be posting the recipe and such in the Archive! Nice Work - Thanks! Quote Share this post Link to post Share on other sites
Steeldrifter 0 Report post Posted October 29, 2004 John that was a excellent step by step! and i really like your way with words in the beginning of that, you know members can help to add to the articles sections also...with a writting style like that you could do a very nice article for the site SD Quote Share this post Link to post Share on other sites
Streamside 0 Report post Posted October 29, 2004 Thanks guys. I enjoy doing them. It helps me sharpen my internet / HTML skills. Let me know what I can do to improve on my posts. P.S. Is there any pattern in particular you would like to see? I thought I would do a few more terrestrials. Quote Share this post Link to post Share on other sites
Streamside 0 Report post Posted October 29, 2004 QUOTE (DFix @ Oct 28 2004, 09:49 PM) Streamside- Great tutorial and setup on the pics! No doubt you'll be posting the recipe and such in the Archive! Nice Work - Thanks! I haven't figured out how to post in the archive yet. LOL I'm still banging my head against the wall! Quote Share this post Link to post Share on other sites
BusterWolfe 0 Report post Posted October 29, 2004 Sweet tutorial. That one's going to the printer. Quote Share this post Link to post Share on other sites
MIKE*A 0 Report post Posted October 29, 2004 Awesome!!!! Thanx Quote Share this post Link to post Share on other sites
mcfly 0 Report post Posted October 29, 2004 Great work Streamside.. Quote Share this post Link to post Share on other sites
CharlieD 0 Report post Posted October 29, 2004 Very nice! I love Henry's Fork Hoppers. Charlie Quote Share this post Link to post Share on other sites
Fly1 0 Report post Posted October 30, 2004 Nice ty and nice story too but that bench is just too neat and tidy for my liking To add your pattern to the data base just click on the Fly Pattern Database button at the top of the page. When your in look for the upload pattern note at the top of the page and click on that and follow the form. Ken Quote Share this post Link to post Share on other sites