
drgulian
-
Content Count
18 -
Joined
-
Last visited
-
How to prepare fresh bucktail for tying?
drgulian replied to newsmyrnaflyer's topic in The Fly Tying Bench
Bleaching And Dyeing by A. K. Best has a whole chapter or two on the subject. Cheers. -
rapala style deer hair articulated perch
drgulian replied to smalliestalker's topic in The Fly Tying Bench
Smalliestalker: The coldwater forum has a thread called, "Gulian's not for sale", If you really want to tie one, I'll help you as much as I can and give you some of the obscure methods I used to create it. PM me. Cheers. -
rapala style deer hair articulated perch
drgulian replied to smalliestalker's topic in The Fly Tying Bench
Lets see some pictures of it!! sounds great. http://www.flytyingforum.com/pattern9142.html Please try to pay attention. Sorry, no offence, but I'm pretty sure it's in this thread already and my typing skills are a bit lackluster... -
Since Russ no longer has a web presence that I know of, I would say your best bet would be to ask Jim at http://www.hydrusx.com He could tell you exactly what you want to know. That's all I'm gonna say about that. Good luck.
-
rapala style deer hair articulated perch
drgulian replied to smalliestalker's topic in The Fly Tying Bench
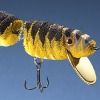
I've only given it the bath tub test, but so far, it has the best action of any fly that I have tied! It floats becuase the deer hair is so densely packed yet the metal lip orients the fly immediately. When tugged it dives, and it turns on a dime. It really has exceeded my expectations. I can't wait to fish it properly, but the trout streams are closed until May... I'm just gonna try to build up an arsenal from now until then and bide my time. It's not like I'm in a hurry. I know it will work, no question. I'm really more interested in how to present it and with what type of tackle will be the most fun and efficient. -
Thanks for the tip. I think I'm looking for some people with CNC's and servos and whatnot. Someone who can turn data and a 40 foot coil of wire into a product. Thanks though, anyone else have a tip?
-
rapala style deer hair articulated perch
drgulian replied to smalliestalker's topic in The Fly Tying Bench
I used a #3 french spinner blade and took a small rattail file to ream out the existing hole so that it would fit over the hook eye. Then I made a tool from a piece of wood with a 45 degree angle cut. I tied the first three iterations of the fly and then trimmed it to shape. Then I slipped the lip in from the rear and used two ton epoxy in three stages to secure it, using the wood block for orientation. Then continued the deer hair stacking and trimmed up afterward. I hope that make a little sense... Clear as mud right? -
Here is one option for split rings. http://lurepartsonline.com/cart.php?m=prod...tail&p=1377 I'm sure there are many more...
-
Use a Double Waddington Shank...
-
Hook + wirecutters + snip = done
-
Does anyone know how to have a custom shape hook manufactured? Or does anyone work directly for a hook manufacturer and can put me in contact with someone who can form wire? I'm looking to have some custom made double waddington shanks with a couple of extra bends made for my latest flies. Any help would be great. Thanks.
-
rapala style deer hair articulated perch
drgulian replied to smalliestalker's topic in The Fly Tying Bench
Does the lip go through the hook shank? Or maybe I should just ask, How are you attaching the lip? I posted a similar fly in the cold water section... http://www.flytyingforum.com/pattern9142.html I ask because I like gathering intelligence on this kind of stuff. cheers -
I just got some materials in the mail for the next couple of versions based on the last one, so, once I get my fly tying area cleaned up and organized, I'll tie some more... Should be ready in a couple of years...
-
Classic, simple, effective. Well tied. Very nice! Consider using a cree collar when the caddis hatch is going.
-
I originally started tying these as tube flies, but then moved on to using the double waddington shanks. Maybe I'll post a picture of some of the tube flies that became "work in progress". Thanks for kind words.