
Firetiger
-
Content Count
638 -
Joined
-
Last visited
Everything posted by Firetiger
-
Glad to hear that Jan! The Daddy is a cool little fly, one that looks well both in the eyes of fisherman and trout alike. I truly enjoy both tying and fishing them. Speaking of swaps - have the Bloodworms made it to you? Big E has just received a package I posted together with the one for you, and he now lives in Washington state, so I would expect them any day now. J.
-
Terje, that is a very cool fly. Norwegian trout surely love them. Czech ones do, especially in the late summer/early autumn. I tie mine crane flies/daddy long legs in a very similar way to you, just lazy as I am I omit the hackle and darkish spots on the chenille body. Thus mine do not float as high as yours and I fish them sort of inside the film, perhaps slightly wet. The trout seem to like them this way though. This is a bunch I tied for a swap about a year ago Cheers! J.
-
Always a pleasure to do business with you ;-) Glad you like the CZ ones. Cheers! J.
-
Thank you guys, I tried many chironomid patterns over the last couple weeks, but I like this one the best J.
-
Terje, no wonder you have many friends when you treat them to flies like this :lol2: Cheers! J.
-
A new addition to the fly pattern database has been submitted by Firetiger: Black 'n Pearl Buzzer
-
Your Inglés is much better than my Spanish, trust me. I tried it on http://www.anapam.org/ and even though they have inspiring patterns there I had hard time understanding them :thumbsup: Your experience with medaillon is about the same as mine; and I thought I was special in this respect :lol2: Cheers! :yahoo: J.
-
A cool fly, really like the softex abdomen. It looks so life like! How does the medaillon wing cast? When I tried these a while back they spun like an airplane propeller and made terrible things out of my tippet (I was using about 1.5 metre of 0.10 mm mono, a rather fine stuff), so I converted to CDC; I would be curious to hear your experience. J.
-
CZ Nymph - 10 easy steps :)
Firetiger replied to Firetiger's topic in Step by Step Patterns & Tutorials
Flytyer, the nymph skin is nice, but absolutely not essential. In the era before internet and open borders people over here used anything they could get hold of - including very strange items such as dried mackerel skin, cover from sausages, even latex condoms - for the back cover. My recommendation would be to cut a strip from a heavy duty clear plastic bag just to assert your independence on the fly materials industry Think about the ancients, who had to make do with feathers and fur from their own backyard and local hunting, with a little help from their wife's embroidery basket. -
Thanks for your kind comments; I appreciate that :yahoo: The fly is covered with a resin a friend of mine developed (or rather discovered for fly tying). It has a nice glossy finish and slightly positive density, so it will not sink the buzzer as fast as epoxy or superglue coat would. We are considering developing it as commercial fly tying product and I am giving it some testing. If it performs well I would like to pass a couple samples around and get some more feedback, before investing cash and effort into marketing it Jeff, heat and humidity in MD - I am sure that translates into some serious bass fishing opportunities. If so, then very good for you, bass are sissies that can not face Central European climes and I know them only from (very exciting) stories and legends... J.
-
You should try some stillwater fishing, it is good for you Especially when rivers are still high & muddy from snowmelt. Midge / buzzer pupae have this look when they swim from the lake bottom to the surface to hatch. There is a DVD called Bugs of the Underworld with amazing footage of the emergence, part of which can be (the stage I am trying to imitate appears around 0:50). The pupae have no visible legs or tail, the only major feature I have omitted are the white breathing tuffs on top of their head. Cheers! J.
-
Black 'n Pearly, Red and Light Olive - three new arrows in the stillwater quiver Cheers! J.
-
mono is slippery thing, I usually do the head with thread when doing mono body
-
He he, thanks for your encouragement, gentlemen I was for a long time using the CZ nymphs as a currency of sorts, a couple here and a couple there, a few extras for the swapmeister and so on. People seem to like them and I don't mind tying a few. And when I was offered a few extra bucks, how could I refuse? Cheers! J.
-
Two dozen Czech nymphs tied on order; my first shot at turning pro
-
Karle, I would just hate to disappoint you, you see :yahoo: Denis, Bibio marci is Latin name of the Hawthorn fly, also called St. Mark's fly - it appears in big numbers by the time Hawthorn trees bloom around the St. Mark's day (April 25th). It is the first major terrestrial hatch in the season and on many rivers and lakes provides for exciting dry fly fishing. I'm afraid its presence is limited to Eurasia though. Its close relative is the Heather fly, which is of particular importance on Scottish highland lochs.
-
hmmm.... this fly seems strangely familiar... must have seen it somewhere around :lol2: Cheers! J.
-
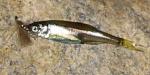
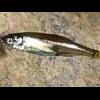
An old favorite from Scotland - imagine an upland loch by a derelict castle, the pipes playing an eerie melody on the background, heather in full bloom and a light wind carrying a fall of Bibio pomonae... Hope to experience it one day... :lol2: Tied as per my Hawthorn SBS, except the legs are black pheasant tail knotted with Burnt Orange UNI floss. Cheers! J.
-
I am unsure whether there is a similar hatch in the US, but this side of Atlantic the Hawthorn fly (Bibio marci L.) is one of the most important hatches of the early season. The flies (they belong to Diptera, the true flies) are very clumsy fliers and are drawn to water surfaces, where they drown in huge quantities and are eaten by trout in huge numbers. It usually appears about the time the Hawthorn trees bloom (late April/early May) and it is one of the first opportunities for quality dry fly fishing. Enjoy! :yahoo: J. Step 1: Hook Selection Select a lightweight curved shank hook in appropriate size; here I am using Tiemco 2487BL in size 12. Size 14 can be also considered, but in my experience fish respond well to slightly oversized imitations. Step 2: Thread The obvious choice is black UNI 8/0 thread. Cover the whole hook thoroughly. Step 3: Body material For body I am using pheasant tail dyed black. It has nice structure and very little bulk. Attach it in the thorax area, in order to avoid any unseemly bumps disturbing the sleek silhouette of the abdomen. Step 4: Build the body Cover the pheasant tail fibres with your tying thread down to the hook bend, wind your thread back to the thorax area and wind the PT fibres back, securing them tightly. You can also (optionally) rib the abdomen to add greater durability; a neat trick is using the leftover part of the tying thread to do so (the part you would normally cut off when initially tying in the thread). Step 5: Attach the legs The legs are very pronounced part of the Hawthorn fly. I am using two knotted fibres of Pheasant tail dyed black (same as the body). The choice of one or two fibres for each leg is entirely optional, I like two for more durable and pronounced legs. Step 6: Cut the legs to size and create thorax Cut the legs so that they will be a bit longer than the hook shank. The long legs are an important trigger point of the Hawthorn fly, you can even exaggerate a bit compared to the natural. Dub the thorax area with a fine black dubbing. I am using muskrat, but any dry fly dubbing will do. Make sure the thorax is short but rather thick - it will hold the wings spread apart. Step 7: Attach the wing I am using Tiemco Aero Dry Wing, but any white or dun polypro yarn will do. Tie the wing as close to the thorax as possible, leaving still room for hackle and head. Step 8: Attach the hackle feather I am using low quality black rooster hackle. The ADW wing will help with flotation, so there is no need for the best quality hackle. Step 9: Wind the hackle Make several turns of the hackle, whip finish. No need to make too many turns of the hackle, the Hawthorn fishes the best when sunk just inside the film. Step 10: Finishing touches Form a neat head, add tying lacquer if desired. Cut the ADW wing to shape. Take a step back and enjoy!
-
I would recommend against trusting a database too much - IMHO much better is trying the stuff out for yourself and getting a "feel" for each material. Some stuff is truly unique - e.g. CDC - while others can be substituted relatively easily - e.g. mink and muskrat dubbing, goose and turkey biots, seal and angora goat fur. Following your tying instinct is in my opinion much better than blindly trusting a dogma. As Morpheus says in The Matrix : some rules can be bent, others can be broken. So free your mind, spread out the wings of your creativity and unleash your inner artist!
-
The http://www.flyfishinghistory.com/ is indeed a very good place to start. It has tons of info on ancient methods, medieval flies (Dame Juliana), early modern fishing (from Walton till 19th century) and the modern times. When doing a presentation you need lots of pictures, which is something this site is a bit light on - but it is a great start and remember, google is your friend There are some challenges - such as tying all the patterns described in Dame Juliana as close to original as possible - that keep popping up every once in a while. There should be lots of pics on line. If you are interested in history of the Catskill style flies pay a visit to blog of Niklas Dahlin - http://mulhonken.blogspot.com/ - he is a great fan of these flies and an accomplished tyer J.
-
there is a nice article on the net that got me started: http://globalflyfisher.com/tiebetter/dubbing/
-
Old Hat, you sure know your soft hackles. Neat piece of work - especially like the sparse hackle and neat head. J.
-
CZ Nymph - 10 easy steps :)
Firetiger replied to Firetiger's topic in Step by Step Patterns & Tutorials
Thanks guys for your kind comments! I was meaning to write this SBS for some time, but procrastination is my second nature I'm glad I pulled myself together. Jan, thanks for reminding me you had some of my nymphs from the past, I was meaning to send a couple with the Carp swap. I will tie something else instead Dart, there are very few absolute truths in CZ nymphing; as Morfeus says in The Matrix "some rules can be bent, others can be broken". You can work with round lead if that is what you got (hint: try running an empty beer bottle over the wire). You can make smallish CZ nymphs if needed - for my grayling fishing I go down to #16 and I heard of guys tying them on #18s; but in such case you should drop the lead (and sink the fly with a split shot or a sacrificial fly). About the only rule that should never be broken is the slim silhouette. Cheers! Jindra -
Step 1: Hook Selection Select a scud hook of appropriate size. By appropriate I mean rather large - this one is size 8 and it is my favorite size for trout fishing. You will want your nymph to be both slim and heavy at the same time; that simply does not work in sizes 14 and upwards. Step 2: Weight Add a layer of lead. Flat lead works the best; it packs more tightly than round lead and high density is crucial. In this example I went for one layer of lead, but you can add two for extra weight. In such case make the second layer one turn shorter on each side to preserve the tapered look. Make sure the lead does not extend past the hook bend - you want to leave a plenty of space to tie in the ribbing and back cover. Otherwise your nymph will have a fat ass, which is a major NO, NO! (any ladies reading this post? ) Step 3: Thread Tie in your thread and tightly lash the weight to the hook. I have selected UNI 6/0 thread in color tan. The 6/0 thread is stronger than 8/0 I use for most of my other tying and can stand some abuse - it will receive a lot! I want my lead packed ever more tightly, high density is very important for a CZ nymph. I selected color tan so that it will not darken the dubbing as black thread would. Step 4: Rib and Back Cover Now make use of the empty space you left in the hook bend and tie in first the ribbing - I am using 0.16 mm monofilament spinning line here - and then back cover. For back cover I am using 4 mm wide strip in honey color, so it will be just a shade darker than my dubbing. Lash both to the hook bend very tightly, keeping in mind that the fat ass you are trying very hard to avoid. Step 5: Abdomen Dub the abdomen - about one half of the nymph body, perhaps slightly more. I am using hare dubbing color light olive here, rabbit will work also fine. If using natural dubbing (which I strongly suggest) be aware that it will darken once wet and select the color accordingly. Again, keep in mind the fat ass you are trying very hard to avoid! Step 6: Hot Spot Dub the hot spot (optional). Use bright red, orange or hot pink colors. Here I am using Seal fur colored hot orange. The hot spot is optional - when fishing it can make your day or scare the fish witless for no apparent reason. Step 7: Thorax/Legs Dub the front part of the fly. Use scruffy dubbing with longish hairs, so it will add movement to your fly. I am using black hare mixed with black seal. Leave just enough space for the head. Step 8: Fold Over the Back Cover This is the tricky part. Fold over the back cover, stretching it slightly forward so that it covers the body snugly. Tie in with your tying thread and secure tightly. Whip finish - and only then cut the redundant part off. Few things are more frustrating than having the fly come apart at this stage due to sloppy tying of the back cover. Trust me. I had it happen many times, and you would not wish to hear what I had to say about it. Step 9: Wrap the ribbing Now that the tricky part is done you wrap your ribbing. Make sure you wrap in the direction of your tying thread, mono is slippery and you want your fly to look neat. Step 10: Finishing touches You are almost done. The only finishing touches left are brushing your fly vigorously with a velcro strip and coloring your head and front half of the back cover with black marker. Take a step back and enjoy!