
Dave Pamenter
-
Content Count
60 -
Joined
-
Last visited
Everything posted by Dave Pamenter
-
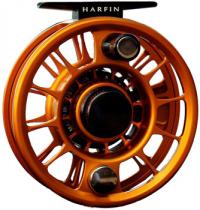
 Just thought I would share this info with you all, a local engineering company in AU has changed from auto parts to producing quality fly reels that are being used all over the world. Here is a link to their FB page, their webstore goes live on 01 May 15. I own 1 of their reels and they are a fantastic piece of kit...........check them out. https://www.facebook.com/pages/Harfin-Fly-Reels-Australia/458354207574570?fref=photo
 -
New saltwater patterns I have been trying.
-
Not too much from the bench down here in AU, but here are a few.
-
May 2013 Flies from the vice
Dave Pamenter replied to riffleriversteelheadslayer's topic in The Fly Tying Bench
This is an EP Fibre Shrimp pattern I found on the Australian Salt Water Fly Fishing Forum. Here is my first attempt at it and I was pretty happy with how it turned out. -
That is a fantastic bench, thanks for sharing. Gives me some ideas for my next project.
-
I had been looking for a material storage solution, came up with a little cupboard set up where I can slide containers from the local hardware in and out. Plan is to build 3-4 of these.
-
What a fantastic idea.....I am an Australian Veteran and here we have nothing at all remotely similar to this. Once you leave active service it seems the whole world forgets who and where you are. I will get a parcel off this week to the address above. Dave
-
Fly rod building parts
Dave Pamenter replied to Fish For Life's topic in Fly Fishing Gear & Techniques
Mudhole is good, I have also used http://www.getbitoutdoors.com/ Dave -
Instead of clogging up the forum with new threads, I might just post all my first attempts in one location. So to kick it off I have just finished my first attempt at the Mylar Minnow, thoughts?
-
Another contribution for the month, called 'The Scruffy Charlie'........here is my first attempt at this pattern.
-
Yes they are.
-
We have an impoundment not far from where I live that has a healthy population of Bass and Saratoga, so trying some small poppers for the bass. Here is a sample to date, just waiting on the Copic Markers and a Letraset Pro Marker Fly Tying color set.
-
My first every fly - tied a simple clouser
Dave Pamenter replied to Dave Pamenter's topic in Beginner's Corner
Well I have been busy and have been playing around with materials etc for the clousers. Found the bucktail I was using could be better and found a local shop that sells Wapsi products, they are just so much better than what I have been using. So here is a smaller size #1 clouser and a local favorite called a flathead bendback. -
No probs Kev, let me know if I had paid enough to your PAYPAL acct for postage, last thing I want is you out of pocket. Dave
-
Thank you all, got my flies this morning, many good patterns in there. Dave
-
Pls forgive my ignorance but what is a 'mystery box'.
-
This top 3 in this photo are a blood worm pattern, these are the first 3 I have tied, looking forward to testing them out on the local winter Whiting population on the flats.
-
New pattern I discovered tonight, the bendback, this is the first one I have tied to use on Flathead in the local flats........can't wait for the new rod to arrive so I can give these puppies a swim......
-
I use 5 minute epoxy (adds a little weight) and it binds the feather when you palmer it through. You could use a UV reactive option, set it with a quick burst of light, palmer the hackle through and finish setting it off.......would be quick also.
-
I got this recipie from Chris Beech who credits a source in the USA Flats Master Hook: Mustad S71SZ #4-#2/0 or Gamakatsu SL12S #1/0-#2/0 Thread: Tan Flat Waxed Nylon Eyes: I-Balz (5/32 for #4-#2, 3/16 for size #1/0-#2/0) Tail: Tan Marabou Blood Plume over Pearl Krystal Flash outside of which is a pair of Grizzly Hackle Tips Body: (Optional Lead Wire overwrapped with) Pearl Mylar, epoxy over with a Palmered Grizzly Neck Hackle, stripped one side 1. Tie in a base of thread and tie in your pearl Krystal Flash above the hook barb. 2. Tie in a tan marabou blood plume with a grizzly hackle tip on each side splayed outwards. 3. Tie in a grizzly neck hackle with half of the fibers removed before tying in a piece of pearl mylar. 4. Wrap lead wire down the length of the body if desired and overwrap with thread (this is an option, omit if you are fishing shallow water). 5. Wet the body with head cement and wrap the pearl mylar to just behind the hook eye and tie off. Don’t trim. 6. Mix your epoxy. After a few minutes, apply a light coat over the pearl mylar wrapped body. Rotate as the epoxy sets. Your thread should be hanging on the thread stand ready to tie off the hackle. 7. When the epoxy gels, palmer the grizzly neck hackle through the epoxy coated body with evenly spaced wraps. Make two wraps before tying off and trimming the hackle. 8. Tie in I-Balz, whip finish, apply head cement and trim the underside of hackle fibers. 9. Present to your local bonefish, or goldies, or flathead, or…
-
A local pattern for the coastal flats around the south east coast of AU, its called the 'flatsmaster' This is my first attempt at the fly design posted by Chris Beech on Australian Saltwater Flyfishing Online......if anyone wants tying instructions I can supply.
-
Sounds like a lot of fun! Have you tied up a bunch of flies to get you through the rest of the summer? Sure have but its Winter over here, though you would not know it.
-
Well happy days, I have just ordered my first rod & reel. Been tying flies for a month or so now and finally got around to the business end......... ended up ordering the Sage Xi3 890-4 and a Sage 4280 reel. Very much looking forward to them arriving next week Dave
-
Very good. Do you make your backs with a very thin plastic first then coat with resin? Just wondering how you get that defined edge to the back? I use a plastic table cloth that my wife gets for me at a shop called Spotlight. I cut with the shrimp cutters and shape the head so it sits between the eyes. I coat with UV knot sense, set with the light then cover with sally hansons because I don't have a turny turny thingie to rotate the fly if I use liquid fusion etc. I can send you some samples of the carapace I use in a couple of sizes if you want, just PM me the postal details. Dave
-
Latest prawn pattern.