Poopdeck 0 Report post Posted December 13, 2015 I posted this tutorial in another forum. I cut and pasted it to this forum so I'm hoping the order is correct. First the furling "jig" or as i lke to call it a simple board with dowel rods clamped to it. It's nothing more then an 8' by 4" length of plywood. You can use a two by four or what ever you have laying around. The pegs are 3/4" dowel rods screwed onto a block of wood. You can see some of the pegs are on the right side and some are on the left side. These are the steps that create the taper. Simply screw the dowel rods on one side of the block. When setting up the jig just flip them around for the left or right side. The end dowel is the center peg. This is screwed into the center of a block. I put hard board sides on the blocks but they are not needed. The length of the board determines how long you make a leader. I typically use 5 to 6 foot leaders. If you want longer then that you will need a longer board, or a second board, or no board since you can set it up on your porch railing or dinging room table. Attached to the end is a very crude and simple gear box I made from plywood, screw hooks, a screw, and three gears I ripped out of an old VCR. This gear box is what makes the process super simple and can be cobbled together in an hour or two. The hooks are simply screwed into the gears. The large screw on the back drives the gears with a cordless drill. The center hook with spin in a clockwise direction which in turns drives the two outer hooks in a counterclockwise direction. This is important when we actually start furling. You can use any gears you can find, plastic, metal whatever. If your kids have Legos you can use the big knobby Lego gears if you care to. You will need a soup can to hold weights to provide tension during the furling. The can hangs from the wire. Attached to the wire is a ball bearing swivel. After laying out the line the center peg is replaced with the snap swivel to hold the line during the furling process. When done furling the swivel becomes important to "relax" the line. This is the point where people tell you to hang the leader from the ceiling to let it relax. The swivel negates having to hang the leader and greatly simplifies the relaxing process. These are the very specialized tools needed to furl. A paper clip, two pieces of doubled over and knotted braid, a bobbin (not needed but nice to have, this one is a cheap 5 dollar non ceramic bobbin)' and a knit picker. A knit picker can be purchased at walmart sewing centers, Joanne fabrics or craft stores for $1.50. A knit picker is used to pick knits out of sweaters. To set up our board to make a leader we need a formula. I use the big furled leader formula (BFLF). More on the BFLF later. What's important about a formula is they are just guides. You can do whatever you want. This formula is for a 70" 4 step leader with a 60% slope and 12% reduction or twist percentage. The 4 steps is what progressively tapers the leader. You can make 2, 3, 4, 5 or however many steps you like. Generally there really is not much gained after 5 steps and I generally stick to 3 and 4 step leaders. Understanding that the hooks on the gear box represents the butt end and the center peg or tippet peg (TP) is the tippet end. Pegs 1, 2, 3 and 4 are the step pegs. In the chart you can see a highlighted column titled peg positions. Under that are measurements in inches for the pegs. As you start at the top and go down you alternate the pegs from the left side to the right side. So peg 1 is clamped 31" from the hook on the left side of the board, Peg 4 is clamped 51" on the right side, peg 2 is clamped 64" on the left side, peg 3 is clamped 73" on the right side and the TP peg is clamped at 80" in the center of the board. I know the diagram is crappy but its the best I can do. On the chart you will see a highlighted row titled "loops" followed by 5.5, 4.5, 3.5, 4.5, 5.5. These numbers represent the number of times you will turn the thread around each step peg. So starting from the left hook peg 1 has 5 turns, peg 2 has 4 turns, peg 3 has 3 turns, peg 4 has 4 turns and 5 turns back to the right hook. If you follow my crappy diagram you will tie an overhand knot in the thread and loop it over the left hook. Take the thread up to and around peg 1 and back to the left hook five times. Then go from the left hook right on past peg 1 up to and around peg 2. After going around peg 2 return the thread to peg 1 but don't go around peg 1, rather slip the bobbin thru the peg one loops and return and go around peg 2, back to peg 1 and thru the loops back to peg 2. After doing that four times you will advance the thread right past peg 2, around the TP peg, around peg 3, back around the TP peg and back to peg 2. At leg 2 you will slip the bobbin between the peg 2 loops like before and back around you go again. After doing that 3 times you advance to leg 4 and do the same procedure making 4 turns and then finally 5 turns between peg 4 and the right hook. Simply tie another overhand knot and loop over the right hook. Now your done laying it out. The layout is a very easy process. I hope I was not confusing in my explanation and crappy diagram. Here's the board set up with the peg positions from the chart. You can see pegs 1 & 2 on the left side, TP peg in the center and pegs 3 & 4 coming back on the right side. Start with an overhand loop knot and lay the loop over the left hook Take the thread down and around peg 1 returning to the left hook. Do this five times (or for however many loops your formula calls for) after you have five loops, advance the thread right on by peg 1 to peg 2. Go around peg 2 and back to peg 1 four times. On the return to peg one you do not wrap the thread around the peg. Instead slip the thread between the peg 1 loops and return to peg 2. Do this for all the turns. After you complete your 4 turns on peg 2 its on our way to peg 3 To get to peg 3 we have to go around the TP peg. As you can see the TP peg simply changes the thread direction to form the second leg. It's just the point where we double over the line. Do the same process wrapping the thread three times between pegs 2 & 3 as we did before making sure you go around the TP peg. Follow the same procedure doing 4 turns around pegs 3 & 4 and then 5 turns around peg 4 and the right hook. Finish with an overhand loop knot slipping the loop over the right hook. At this point we have laid our line out according to our formula. Time to twist and furl. Start by attaching your soup can swivel to line at the TP peg. Add 23 oz of sinkers, or whatever the formula calls for, to the soup can Now remove the TP peg as its job is done and allow the soup can to keep tension on the line. I made a fancy wheel for the wire to ride in but this isn't necessary. You can simply let the wire run over the edge of the board. Now it's finally time to get down to business. Time to twist the two legs. After applying tension to the lines with the weight can pick all the lines up off their legs starting at the tippet end and working toward the butt end. After lifting off the pegs make sure both legs are running down the middle of the board between the pegs. You will see that the tippet end/swivel is on the 80" mark. take the TP peg and set it on the board between the two legs down by the tippet end. It's not clamped its just sitting there. This is to keep the two legs from furling around each other. Right now all we are doing is twisting both legs. Take your drill and use it to drive the drive screw on the gear box. It does not matter if the drill is in forward or reverse as long as it stays in the same position throughout the entire process. As the hooks twist both legs they will shorten. When the tippet end/swivel gets to the 70" mark we have achieved our 12% reduction and can turn the drill off. Both legs are still separate. We now transfer the butt ends of each leg from the left and right hooks onto the center hook. I use a paper clip to pick up the loops and a bodkin to keep the loop open so I can slip it over the center hook. The line is still under tension so without the bodkin holding the loop open the tension would snug the loops tight around the clip and you wouldn't be able to slip the loops off the clip onto the hook. Grab your drill and engage the gear box drive screw. The center hook rotates in the opposite direction as the left and right hooks. That's why you don't have to change the drills direction. First I put a few furls in the line so I can slide the doubled over knotted braid lines in between the two legs. Place them about an inch from both ends. This is to facilitate the shorb loops. If you not going to use the shorb loop you can omit this process. Start drilling to furl the two legs into one line. At first the line will lengthen but then it will get shorter. When the tippet end/swivel hits to 70" mark we again achieved our 12% reduction and we can set the drill Down. Time to relax the furl. Simply grab hold of the swivel at a point where you will not impede the rotating nature of a swivel. Induce some slack or a bow in the line and the swivel will start spinning, relaxing the furl in the process. When it stops spinning it is relaxed. If you did not put the braid in because you are not going to finish with shorb loops then simply tie your favorite loop knots on the ends and the leader is done. First tie off the butt end to lock the furl in then tie off the tippet end. A knot works just fine but a shorb loop is more finished looking and appears smooth and knot less. The shorb loop. Start at the butt end. Open the knit picker and hang the hook off of the loop of the braid. Grab the knit end of braid in your teeth and pull up while gently twisting and giggling the line until you pull the picker up through the middle of the furled line. Carefully gather all the loops off the hook and capture them in the picker. Close the gate on the picker around the loops. Pull the picker out of the main line pulling the captured loops thru the main line as well. This will form a large loop. Open the gate on the picker and push the captured loops down over the open gate and onto the shaft of the picker. This frees up the hook to grab the big loop we created in the previous step. Capture the big loop in the picker and close the gate. Pull the picker and loop through the small loops on the shaft of the picker. If you can't pull the loop tight and it looks like you have two loops in a row just take something bulkier like scissors and insert them into the end loop and pull down on the line to snug the knot up to form one loop. Do the same on the tippet end and you are done. A perfect knotless progressively tapered "custom" leader made to your very own specifications. I know the post is wordy and picture heavy but it should leave very little questions on how to do it. I hope it shows how easy it is and how cheaply they can be made. I think it also shows how customizable a furled leader can be. The possibilities are endless. Quote Share this post Link to post Share on other sites
mikechell 0 Report post Posted December 13, 2015 And that's why I'll buy one if I ever decide to try one again. Quote Share this post Link to post Share on other sites
retrocarp 0 Report post Posted December 13, 2015 That's awesome thank you......there's a project for me in the new year. Quote Share this post Link to post Share on other sites
Poopdeck 0 Report post Posted December 13, 2015 And that's why I'll buy one if I ever decide to try one again. It's not that hard. In fact it's as simple as tying your shoe. If I were to post an easy to understand tutorial on putting your sneakers on it would be just as long. Laying out the thread takes a minute or two. Twisting and furling takes a minute or two and tying a shorp loop is just like tying your shoe. It's only lengthy and difficult trying to explain how to do it. If you give it a try you will be scratching your head wondering why you have been paying 10 or 12 bucks for one generic leader that is less then optimum for you. Quote Share this post Link to post Share on other sites
utyer 0 Report post Posted December 13, 2015 I built my own furling jig from instructions I found on the internet, over 6 years ago. They work, but I found them not worth the trouble to keep making them. For Saltwater fishing a simple three step leader is all I need. Quote Share this post Link to post Share on other sites
mikechell 0 Report post Posted December 13, 2015 You missed the point of my post, PoopDeck. I don't use furled leaders. I tried one once, but didn't like it after just one trip out. I doubt I'll ever use one again. Quote Share this post Link to post Share on other sites
kennebec12 0 Report post Posted December 13, 2015 I tie the line to the table leg, stretch it straight, cut it off, double it end to end, pinch the loop, throw one half over my shoulder and twist then tie it off with a surgeons loop. Last's usually one season and I make one for each of my rods, takes 15 minutes max for each leader. Maybe if I was mass producing them this would be nice. Quote Share this post Link to post Share on other sites
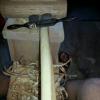
JustSomeGuy83 0 Report post Posted December 13, 2015 Excellent write up. Being a cheapskate I decided to start making my own leaders after seeing the prices for tapered leaders. I knew I'd be going through the fluorocarbon ones pretty quickly and I didn't like the memory they held. I decided to go this route with the furled tapered leaders since I can make them for pennies on the dollar instead of paying $10+ for one leader. I understand people not liking these types of leaders but thankfully, I personally do.For anyone interested in doing this, I will put in my two cents. You can streamline the process by putting a spreader between the two lines as they get twisted. This will cause it to furl on it's own, therefore completely skipping any need to drill the lines together in the end step. You'll of course need to add extensions from the gear box hooks to allow the lines to be furled completely.I'd also recommend making a gear box with a motor and a dimmer switch. A sewing machine motor is the best option given the brushes inside the motor allow for the dimmer switch to operate properly (the ability to speed up, slow down, or completely stop the motor). Here are a couple of photos of mine: Quote Share this post Link to post Share on other sites
Poopdeck 0 Report post Posted December 13, 2015 You missed the point of my post, PoopDeck. I don't use furled leaders. I tried one once, but didn't like it after just one trip out. I doubt I'll ever use one again. That's why I would never ever buy a furled leader. I know I would not get the right one. As I said if you had a bad experience with a thread based furled leader it was because the leader was not made to the size and composition that best suits you. At 12 bucks a pop it's way to expensive to search out, buy and try different types to find one the fits your needs. Justsomeguy - I have had a sewing machine motor for over a year to do just that. Maybe this winter ill put it together. I like how you put the gears in. With mine I could simply drop my gear box in another box and I'm up and running. Quick question, why do you have a grounding strap inside the box? Quote Share this post Link to post Share on other sites
JustSomeGuy83 0 Report post Posted December 13, 2015 Justsomeguy - I have had a sewing machine motor for over a year to do just that. Maybe this winter ill put it together. I like how you put the gears in. With mine I could simply drop my gear box in another box and I'm up and running. Quick question, why do you have a grounding strap inside the box? Is it not necessary? I know very basic electrical work :-/ . I would like to redo my gears and make a legit box that I could slide into this contraption but for now this works for me. Quote Share this post Link to post Share on other sites
Poopdeck 0 Report post Posted December 13, 2015 Electrically I'm in the same boat as you but if its a grounded outlet and plug I don't think it's needed. I like your setup. I like simple. Quote Share this post Link to post Share on other sites
mikechell 0 Report post Posted December 14, 2015 You missed the point of my post, PoopDeck. I don't use furled leaders. I tried one once, but didn't like it after just one trip out. I doubt I'll ever use one again. That's why I would never ever buy a furled leader. I know I would not get the right one. As I said if you had a bad experience with a thread based furled leader it was because the leader was not made to the size and composition that best suits you. At 12 bucks a pop it's way to expensive to search out, buy and try different types to find one the fits your needs. Actually, the one I tried was a mono one, made by a poster on another site like this one. He gave me one based on the type of fishing I do. So, it was free, no reason to "not like it" based on price. I didn't notice any improvement to my casting or fly placement, but I did have to clean my glasses off about every tenth cast or so, due to the water it picked up and threw on me. Building and using a contraption like yours, just to try different types seems like a huge wast of time, space and materials. If I still didn't like them, I'd have spent quite a bit more than "$12 bucks a pop" and would have the contraption to get rid of. Quote Share this post Link to post Share on other sites
phg 0 Report post Posted December 14, 2015 You can make a perfectly functional furling jig out of a 2x4 and some 8d finish nails, stuff you might easliy have on hand already. Likewise, I use fly tying thread, that I already have on hand. So, while there is some small cost to making a leader, it's no extra cost to me. If you don't like them, you don't like them, and that's OK. Furled leaders are not for everyone, and not for every fishing situation. When I am trout fishing, though, I use them exclusively, and I have never had my thread based leaders spray my glasses. Maybe it's because I wax my leaders (beeswax) so they don't absorb as much water. Quote Share this post Link to post Share on other sites
rstaight 0 Report post Posted December 14, 2015 The jig I built I added some legs to it so I could stand it up on end. Here is what I do. 1) With the jig laying flat I loop my material around the hooks and pegs per the required recipe for each leg. I have 2 legs on my jig much like what is shown above. 2) With a cup hook in a cordless drill I twist each leg of the leader until they shorten 10%. Both legs must be twisted in the same direction. No matter which, just the same. 3) I have another peg at the length for the 10% reduction. After each leg is twisted it is placed on a cup hook at that peg. While you are twisting the legs you have about 3oz of weight hanging at the end of the leader. This keeps the leader straight for the next step. 4) Now I set my jig in end with the legs I added at slight angle. Since the legs are now on the same hook I pull the leader off the bottom peg and let go. Because of the twisting each leg will want to untwist. This will cause the 2 legs to twist onto each other creating the furled leader. If the legs are not twisted the same direction this will not work. No need to use a drill to make the final twist. I have seen some other instructions for a twisted leader. I think the ones you make without the jig are called a Bimini Twist. Quote Share this post Link to post Share on other sites
Poopdeck 0 Report post Posted December 14, 2015 Actually, the one I tried was a mono one, made by a poster on another site like this one. He gave me one based on the type of fishing I do. So, it was free, no reason to "not like it" based on price. I didn't notice any improvement to my casting or fly placement, but I did have to clean my glasses off about every tenth cast or so, due to the water it picked up and threw on me. Building and using a contraption like yours, just to try different types seems like a huge wast of time, space and materials. If I still didn't like them, I'd have spent quite a bit more than "$12 bucks a pop" and would have the contraption to get rid of. Like I said, you did not use the right leader. mono is a terrible material for a furled leader. It's only application is for the heaviest salt water use. Because of mono's stiffness hand furling is all that is needed and there is no need for a jig. For fresh water a thread based leader is the only true furled leader. For some reason everybody who hates furled leaders say they get a wet face. This is just plain baloney in regards to thread leaders. i tried mono furled leaders and never got a wet anything. I'm sorry you have no where to store a contraption that is nothing more then a 1" by 4" 8' foot board. It is very true that not everybody like a furled leader. This post is for those who do. Rstaight, it is true the leader will furl all by itself once the legs are twisted. However, the furl will be tighter if done mechanically. I have never looked back after using a furled leader and use them for dries and nymphing for trout and any warm water species in creeks, pond, and shallow river fishing. In fact if I have floating fly line on I also have a furled leader. Quote Share this post Link to post Share on other sites