flyboyutah
-
Content Count
102 -
Joined
-
Last visited
-
Nicely done everyone, congrats :clapping: :clapping: steve
-
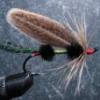
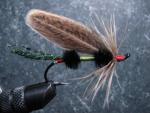
Brian , welcome to the addicting sport of tying . I myself in Utah , was pointed to some of the local favorites, when I started tying a couple years ago. These are the ones I started with: 1. RENAGADE (butt hackle = brown hackle , body= peacock herl , front hackle = white hackle) 2. RIO GRANDE (tail=tippet , body= blk chennele, wing = calf tip, brown hackle) 3. PHEASENT TAIL -beaded & non beaded 4. WOOLY BUGGERS - Blk, BRN, GRN 5. ELK HAIR CADDIS - Tan ,Olive Hope that helps Steve
-
I agree with Soft Hackle, pratice is key to getting better . I think you improve through tying and repeating and improving the last fly you tie . Try to be consistant with how you tie your flies. ( Like if you made only 3 wraps of dubbing for the thorax and it looks good , try to remember so when it comes to the next one it will look the same.) etc. You have found a awsome resource to use and many helpfull guys here, dont be afriad to ask if need some pointers. steve
-
Depending on your printer , you may have a "photo shop" type of program with it , to resize the picture after downloading it to your computer. After I load them up on to my computer, I'll change the size , not sure what the size other than the " E-Mail " size . Try that to see if that works plus it seems to load much quicker than what the true size would . Hope that helps steve
-
Nice start. I would agree also about the hackle length . I would also try to make a smaller head. Try to keep your head wraps small , just give your peacock and hackle about two wraps each. You just need to hold them inplace till you whip finish, remember when you whip finish your adding thread also . steve
-
Welcome and enjoy. Great bunch of guys and gals here . If you ever have a question someone here will be able to help or point you in right direction. steve
-
Pics of new cases, one is Bubinga and other one is Purple Heart. steve Bubinga on left / Purple Heart on right
-
I usualy do a three to four turn whip 2x , and as for cement or glue , I usually use a nail hardner . A quick tip I found, on a good holding whip is NOT to cross the wraps, try to lay them next to each other. I also like to start my first wrapping from back to the eye, tie, than the second whipping , eye back to the body than ,tie off ,cut. steve
-
thanks guys for comps. I would like to make a few inprovements to it though , it was kinda a prototype . steve
-
check local taxidermy see if they have any steve
-
I would like to say awsome your taking the the time to teach and get some more guys started. :headbang: I agree keep it simple at first, wooly buggers, renegage, ears hare, The biggest problem I had at first was and had to figure out , would of loved for someone to show me than to loose alot of hair over . (not that I wasn't losing fast enough) :hyst: :hyst: 1. thread tension and control around the barb and, even wrapping material on, I think there is nothing more frustrating than that notorious breaking of the thread thing that we all have had before aspecially when you new at it. 2. How to make a clean looking and none bulky head 3. How to use the wipe finisher. 4. And to know that its a relaxing hobby right.......
-
For me on the amount either depends on if its light or darker color pattern. I kinda like a little thinner wing on the lighter colors , tans and lt. grays and a little thicker on the , olive and dark tans . I it comes down to what looks good to you...... , some days I tie to "tie" and most times its to relax and not rush and to polish my techinic I guess my advise would be try to make the wings with a nice shape the .... tent shape with the 45* taper to the back and up. hope it help and good tying steve
-
Here,s some pictures of my travel box / base . I wanted to keep my vise portable and be able to stow away if needed. So came up with this idea. I routed out the shapes of the vise pieces , to what would be the bottom of the base { or the inside of the box when closed }. The wood on the upper half is three pieces { two outer ones are Birds Eye Maple and center one is Babinga } glued to a soild piece of oak to make the bottom half. steve
-
While you guys are on the subject of flash and storing . Does anyone have same problem as I do with static electricity when using the flashabou ? It seem like every time I pull it out to use it , the stuff goes crazy like a bad hair day, ( back whan I had hair that is :hyst: ) steve
-
I just recieved my HMH Tube kit from J Stockards. I thought I would start with that to try out . Plus I,ve been looking throu my Salmon & Steel head book making a "grocery" list. steve