Poopdeck 0 Report post Posted May 13, 2020 I figured I would share my powder painting fluid bed system with those who may find it helpful. Why a fluid bed over simply dunking a hot jig into a jar of powder? Great question! First and foremost dunking in a jar produces a very heavy coat of paint that has a tendency to clogs eyes unless you constantly stir and fluff the powder. Second, and equally important to me, when curing in the oven a thick coat has a tendency to sag. So after all the effort you end up with an unwanted nose on the end of your jig. That's just me, others may not have these problems. Now there are many ways to skin the fluid bed cat but I think this way is hands down Unparalleled in its cost, ease and cleanliness. Now you can buy one for 20 to 35 bucks or you can make one from normal scraps and extras most homeowners have laying around the house. If not, no worries, it's cheap to buy everything. Plenty of YouTube videos out there but I swear most make it more difficult and expensive then it needs to be. First, if a video shows unions and male threaded this and female threaded that just stop and move on to the next video. My system is easy and cheap to expand. It requires the following: 1) 2" diameter schedule 40 PVC pipe cut into 4" lengths. $5.00 bucks for a 2' length if you don't have a cutoff from an earlier home improvement. 2) 2" PVC coupler. Just the simple non threaded 1 3/4" tall (or thereabouts) couplers used to glue join 2" PVC pipe together. $0.75 cents. 3) 2" test caps sometimes called knock out caps. $0.38 cents. 4) aquarium air valve. Cheap little blue plastic valve. $2.81 for a pack of 5 plus a couple tees that you don't really need. https://www.petproducts.com/product/lees-lees-airline-control-kit-with-valves-contains-four-4-plastic-tees-and-five-5-two-way-valves?gclid=EAIaIQobChMI7Z7lr8uv6QIVCHiGCh2P3gZREAQYEyABEgJIbPD_BwE Take a test cap and cut the center out leaving the lip and rim. Discard center part keeping lip and rim. Drill a hole in bottom of coupler and insert plastic air valve. I just press fit it in but you can epoxy it in if you don't have the right size drill bit. Epoxy coupler to a pice of scrap wood you have laying around. Make sure the valve is on the bottom. Take a piece of coffee filter and place over the end of a 4" length of PVC pipe. Press the test cap into the filter and into the pipe. It forms a perfect fit. You can trim it if you like but I just leave the tails there. It don't matter. Fill the tube with powder paint. I usually go a little more then halfway. Not all coffee filters are made the same. I like these ones billed as natural. I guess that means they are organic. They are brown. I never found a white filter that worked worth a damn. These brown ones work great. They make great coffee to boot. I have two coupler bases glued down to one board. My fish tank pump has two outlets so I use two cups. You can put a tee in the airlines and run four cups or however many you like. I have no use for more then two and most times I just use one. While you can use the cheapest 10 dollar air pump with great success I found I like to be able to adjust the air flow from the pump rather than the air valve. You can see a pinch value on the one coupler. Before buying the adjustable flow pump I would adjust the flow from the air valve. It worked but i found it's easier to dial in by adjusting air flow at the pump. No worries though doing it through the air valve. The cheapie blue ones are easier to adjust then the pinch valves so don't waste your money on a pinch valve. I put a blue plastic valve on the other side and don't use the pinch valve anymore. What makes it a system is that I cut a 4" length of PVC tube for each color. I put test caps on both ends to hold the powder in. When I want to use the color I replace one test cap with filter paper and the modified cap and stick it in the coupler base. You dont have to jam it in gorilla tight, just make sure it's in kind of tight but not impossible to remove. I guess loosely tight if that's a thing. You can modify one test cap on each tube so you don't have to change any cap when changing colors. I just have a couple modified caps that I swap out. The coffee filter and modified cap will hold the powder in just the same as an intact test cap. This system saves me from having to transfer powder paints and having to clean the tubes. It's the little things in life that make me happy. One thing you will find is the test caps are loose fitting. I simply wrap a layer of painters tape around the rim to make a tighter fit. Don't do this on the modified filter cap as the filter itself takes care of this. Quote Share this post Link to post Share on other sites
Capt Bob LeMay 0 Report post Posted May 13, 2020 Great information - and right on the money... I've been using a single fluid bed for years now (the one that Pro-Tec sells with their powders, complete with air pump...) and have often thought of making my own since the big hassle for me when powder coating is changing from one color to another... When I have orders of 100 per color it's not bad at all - but when I'm getting orders for ten of this color and five of that color - it really slows down my production results..... since I have to spoon out the powder back into it's original container then vacuum out any residue before starting again by loading the next color of powder... Thanks again for a great improvement. As I write this I've just gotten a 200 piece order in four colors... which I'll be getting to today after some fly-tying for my next two charters. Here's what that sized order looks like when it's baking for 15 minutes at 350 degrees... Quote Share this post Link to post Share on other sites
Poopdeck 0 Report post Posted May 13, 2020 Ha! I can bake all mine in a toaster oven that, you guessed it, I picked out of the trash on move out day at a college campus. Changing colors is what separates this from all others. I'm sure you have some 2" PVC pipe laying around. EDIT - Holy crap Capt. Bob! You know I had to look up the price on a Pro Tec fluid bed. They are truely fleecing fisherman selling $1.50 worth of plumbing materials and an $8.00 air pump for $58.00 bucks. Quote Share this post Link to post Share on other sites
bullhead 0 Report post Posted May 13, 2020 I like this version. I tried other assembly methods, filter material etc. but had poor results. With your filter material do you get an even flow of air around the powder? Quote Share this post Link to post Share on other sites
Swamp Fly 0 Report post Posted May 13, 2020 That is pretty much the same system I use with the exception that I never tried those coffee filters, the ones I had sucked. I lucked out and found that the regular copy/printer paper we had in the house works well for me but I suspect that brand may make a difference. I may be out of luck when I need to make another cylinder as I generally buy the cheapest paper when I need more and am not brand loyal. I'll keep those filters as an ace in the hole if I have problems. The only other difference than the paper membrane is that I superglue the paper in place but that does not affect function. FYI, I've learned to keep my "canisters" in a sealed plastic bin and temporarily put another test cap on the bottom end of the cylinder. Our humidity here in S Florida is an issue, dry fluffy powder is a must. I may have to get my system out of the corner sooner rather than later. Since the COVID pandemic started finding components is really tough so I may have to cast and PC soon. Luckily I still have plenty of powder and primers. I pulled a few hundred pounds of lead out of my trap earlier this year. Oh, if you ever have the chance to pick up a convection oven for cheap do it. I love mine as compared to a regular one. Then again I put a couple of hundred pieces in my toaster oven and need a very good consistent cure. 900-1300 fps is kinda tough on the PC so I need every advantage I can get. lol! Swamp Quote Share this post Link to post Share on other sites
Jacks Grampa 0 Report post Posted May 13, 2020 Slick process. Do you cast your own jig heads? Quote Share this post Link to post Share on other sites
Mark Knapp 0 Report post Posted May 13, 2020 Wait, you showed us how to make it, now show us how to use it. Please. This whole thing is foreign to me. I still use Testers model paint and a brush. I could Google it but I might get a BS video. Quote Share this post Link to post Share on other sites
Capt Bob LeMay 0 Report post Posted May 13, 2020 Here’s one source of info on how to use powder coating instead of painting lure heads.. csipaint.com They’re specifically focused on lure making. The outfit mentioned by Poopdeck has much cheaper prices for their powders but they’re an automotive painting outfit. Quote Share this post Link to post Share on other sites
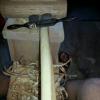
Poopdeck 0 Report post Posted May 14, 2020 11 hours ago, bullhead said: I like this version. I tried other assembly methods, filter material etc. but had poor results. With your filter material do you get an even flow of air around the powder? If by even you mean a nice volume of air to suspend the powder so it looks like moving water if you give it a little shake, yes very even. Of course the color of paint, the amount of paint in the cup and the air volume are equally important as the filter paper. I've tried every kind of paper and filter I ever got my hands on. This particular coffee filter out shines by far everything I've ever tried. No crazy volcanos, which by the way, are caused by not enough air volume not to much air. Generally associated with a poor filter choice though. 8 hours ago, Jacks Grampa said: Slick process. Do you cast your own jig heads? Yes. Been pouring jigs and sinkers since I was a young lad. I fish jigs with reckless abandon since they only cost me the price of a hook, less then $0.20 cents each. I lose a butt ton of tube jig heads, lead jigs, bucktail jigs and drop shot weights every outing. With large bucktails costing between 3 and 8 dollars each and tube jig heads at around a buck a piece, I couldn't afford to fish my way if I didn't make them myself. 8 hours ago, Mark Knapp said: Wait, you showed us how to make it, now show us how to use it. Please. This whole thing is foreign to me. I still use Testers model paint and a brush. I could Google it but I might get a BS video. Pretty simple. First heat jig. Some people put the jigs in an oven and heat a bunch of them up at the same time then pull them out one at a time and powder painting them. This makes no sense to me as you now have to handle little hot things. What I think is best is using a heat gun sometimes I use a propane torch. With a torch I'm prone to melting a few. For a 1 ounce jig it may take 20 seconds with the heat gun. The picture shows me using pliers to hold the jig. This is only because my powder is running a little low and I needed the reach of the pliers to get them deep into the powder. Bare fingers is fine as the hook does not get hot during the heating process. Dunk in powder paint. If it comes out shiny the jig was hot enough. If it comes out powdery or dull the jig was not hot enough. No worries just hold it over the heat gun and it will finish off the paint. Just don't burn or smoke the paint. If your after a white jig all that's left is to cure them. Some paints look nicer over a white base coat so after dunking in the white and heat it a little more over the heat gun and then dunk it in another color. In this case a nice vibrant yellow. Hang them to cool somewhere If you want multi colors just use a paint brush to sprinkle powder on. In this case I did a yellow base coat, sprinkled orange on the back, put it briefly over the heat gun to set the paint then I turned it over and sprinkled white on the belly followed by a little heat to set the white. You can see in the picture I use a flux brush. By sprinkle I mean get a little powder in the brush bristles and then tap the brush over the jig without letting the brush touch the jig. Dusting is probably a better term. After painting you have to cure them in an oven. Depending on paint and color it's typically between 20 to 30 minutes in a 325 to 350 degree oven. Just make sure to clean out any clogged hook eyes before curing. After curing you will have to drill them out. heres a good video showing the process except for the curing that must be a part 2. Curing is only hanging them and putting them in an oven. I know you can handle that without a video. Quote Share this post Link to post Share on other sites
Mark Knapp 0 Report post Posted May 14, 2020 Thank you very much. That's pretty cool. I especially like the your two tone one. Very nice. Quote Share this post Link to post Share on other sites
Poopdeck 0 Report post Posted May 14, 2020 Thanks. That's three tone, orange yellow and white. Quote Share this post Link to post Share on other sites
Capt Bob LeMay 0 Report post Posted May 14, 2020 For heat I use a propane torch (using one of the propane bottles meant for campers, it's short, squat, and very stable sitting at the edge of my bench). Since I'm using a torch all of my jig or lead heads are held in a pair of locking forceps instead of my fingers -cuts down on the adventure side of things.... Instead of using the edge of my bench to hang newly coated items while they cool, I use small threaded rods, about 20" long to hang them on. Threaded rods by the way, are what pros use for serious production work where you have a much bigger air fluid bed that you dip 20 to 30 heads in at a time on threaded rods then hang the rods to cool up on a big wall... They're using a commercial oven to heat a number of racks of heads, ready to be removed while still hot, dipped, then hung to cool... I long ago quit molding my own heads (worried about lead ingestion and more than one guy I knew that went down from non-Hodgkins lymphoma that had definite links to environmental factors as a contributing cause.... Instead I have a big industrial outfit that does that for me in the patterns I pick by the 100, the 1000, or any amount needed. This is their retail side... https://www.lurepartsonline.com/ I started out making my own lures long before I took up fly fishing and began tying flies... and of course, things just got carried away... When you visit a tackle shop or big box retailer and get a look at what's being sold in the way of leadheads and bucktail jigs you won't find many that are well done and also come with good hooks that are the right sizes to actually work well. Once you start doing your own it's not hard to come up with a superior product... Quote Share this post Link to post Share on other sites
niveker 0 Report post Posted May 14, 2020 Great posts, lots of good info. Quote Share this post Link to post Share on other sites
Poopdeck 0 Report post Posted May 14, 2020 Threaded rod is a great idea. I know I have some in the shop somewhere. I'll have to pick some up if I can't find a length. Right now everything in my shop is packed into one corner while I finish my closet doors. When the doors are finished ,hopefully this Sunday, and I can get to my welder I'm gonna make a better rack for my toaster oven for curing. Threaded rod it will be. A good tip indeed. Lead is only dangerous if you vaporize it. At melting tempertures it's no more harmful than butter. Nonetheless I still do mostly all my pouring the way my dad taught me, outside on a stump in the back yard. I say mostly because sometimes I set up in my driveway just outside my garage but always completely outside. I only pour for myself and some friends so I'm not doing that much. I can pour what I need for years in one morning and I have enough clean ingots to last me my lifetime. I will say smelting a big batch of lead and pouring ingots is one of those things that bring me great relaxation as I'm doing it. Probably why I have a lot. Quote Share this post Link to post Share on other sites
Mark Knapp 0 Report post Posted May 14, 2020 14 hours ago, Poopdeck said: Thanks. That's three tone, orange yellow and white. Oh yeah, I know that, three tone. Quote Share this post Link to post Share on other sites