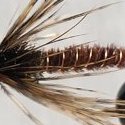
john1962 0 Report post Posted March 16 So I challenged myself today. Smallest hook I used yet. I struggled with the dubbing and the hackle I used was the smallest I could find. I'm not sure about these but I did my best. Criticism welcome. Hook size 16 dry fly Black 140 danier thread Black fine dubbing Black neck hackle (tips). Quote Share this post Link to post Share on other sites
niveker 0 Report post Posted March 16 Lots of people swear by them, I've never had much luck. Quote Share this post Link to post Share on other sites
SilverCreek 0 Report post Posted March 16 1. The hook gap is pretty narrow/ So if you are getting hits but no hookups, use a 2X short hook. It will have a wider hook gap for teh shank length. 2. The hackle is too long. Trim the hackle to proper size on some of the flies and see if there is a difference in the number hits you get. 3. Fish them close to the banks and under overhanging grass and trees. Fish them after right after a thunderstorm. They get washed into the stream Quote Share this post Link to post Share on other sites
flyflinger 0 Report post Posted March 16 Here is one of my favorite ants, and a good example of the incredible innovation of fly tyers! - Cupboard Ant by Umpqua tyer Kevan Davidson. Check out the absolutely clever antenna adaptation he figured out (around the 3 minute mark on the video). Personally, I omit the white post and just use a traditional vertical hackle for legs, trimmed top and bottom. I know this process definitely works if you use the Duck Brand shelf liner, so I have not tried other brands. One $14 roll is a lifetime supply for several tyers! Tying Video https://www.youtube.com/watch?v=X81a5TPpr0o Shelf Liner: https://www.amazon.com/Duck-EasyLiner-Non-Adhesive-Drawers-Cabinets/dp/B09YT65KX1 Regards, Quote Share this post Link to post Share on other sites
RickZieger 0 Report post Posted March 16 I tie most of my ants from the self liner stuff and tie a parachute hackle around the center. Rick Quote Share this post Link to post Share on other sites
john1962 0 Report post Posted March 16 2 hours ago, flyflinger said: Here is one of my favorite ants, and a good example of the incredible innovation of fly tyers! - Cupboard Ant by Umpqua tyer Kevan Davidson. Check out the absolutely clever antenna adaptation he figured out (around the 3 minute mark on the video). Personally, I omit the white post and just use a traditional vertical hackle for legs, trimmed top and bottom. I know this process definitely works if you use the Duck Brand shelf liner, so I have not tried other brands. One $14 roll is a lifetime supply for several tyers! Tying Video https://www.youtube.com/watch?v=X81a5TPpr0o Shelf Liner: https://www.amazon.com/Duck-EasyLiner-Non-Adhesive-Drawers-Cabinets/dp/B09YT65KX1 Regards, That video was a great 💡 Those hooks where labeled size 16 fur ant hooks in the orvis kit I bought, I thought the same thing on the gap. I see I have to buy a hackle measure tool. I just eyeball them. I wasn't sure if I should trim the hackle smaller or not, because I thought the hackle looks to squared off and unnatural. It's all a learn process. Lol you didn't see the first 2 I did. Brown hackle, looked like a alien invasion.🤣 Quote Share this post Link to post Share on other sites
SilverCreek 0 Report post Posted March 16 No one has mentioned the McMurray ant by Ed Sutryn. I have found that this pattern will take trout when they are refusing other ant patterns. The original uses a balsa wood body segments glued onto mono and then painted. https://www.flydreamers.com/en/fly-tying/mc-murray-ant-vl233 Here are the instructions per Jack Tucker of Flyfish@ which was published on the Virtual Flybox. There are two more modern adaptations that work equally well. The first uses foam cylinders cut to size for the body segments and then threaded on mono alternating the short and long body segments. Then glue the body segments into place. Cut the mono later to form the individual bodies. They are really fussy to make and I have my own easier version. All that is needed are foam cylinders of the correct diameter. I make my own using a cork borer, but you can buy foam ant bodies. A cork borer is a set of nested hollow tubes that are used to bore holes in cork or rubber stoppers that are used in chemistry labs for flasks. You can get a used set on the auction site. https://www.ebay.com/itm/264458280950?_ I make my bodies and the string them on a piece of mono and glue them into place. After the glue has dried, cut off the ant bodies and tie the fly. You can make flying ant patterns by tying in a bit of crystal flash as the wings. If you want to coat the foam, they can be painted with liquid latex (Rub-R-Mold) which can be bought at hobby stores. If you are going to paint the foam, you can cut rectangular strips of foam from a foam sheet and then use the rectangular pieces cut to size. The latex paint will smooth over the edges. If you can't decide when to use a red ant or a black ant, make up some McMurray ants with a red thorax and a black body. They work. Here is a black ant I tied using one of my home made cork borer bodies. The second adaptation uses dimensional fabric paint. The paint is applied to thread to form the body segments. Since it is dimensional paint it will form a smooth shiny body on the thread. There is no need to paint since the bodies are paint. Different colors can be used from black to brown to cinnamon red. After the paint dries, cut off the individual bodies with the thread connectors and tie the flies. Either of these two methods make wonderful ants and they are much easier than the original McMurray balsa wood bodies. The dimensional paint can even form the realistic natural tapering of the ant body. I also make Harrison Steeve’s Attract Ants and Transpar Ants http://www.oocities.org/gold_trout/articles/TransparANT.htm http://www.youtube.com/watch?v=sK6P02Dc5pc This is my ant box. Quote Share this post Link to post Share on other sites
john1962 0 Report post Posted March 17 12 hours ago, flyflinger said: Here is one of my favorite ants, and a good example of the incredible innovation of fly tyers! - Cupboard Ant by Umpqua tyer Kevan Davidson. Check out the absolutely clever antenna adaptation he figured out (around the 3 minute mark on the video). Personally, I omit the white post and just use a traditional vertical hackle for legs, trimmed top and bottom. I know this process definitely works if you use the Duck Brand shelf liner, so I have not tried other brands. One $14 roll is a lifetime supply for several tyers! Tying Video https://www.youtube.com/watch?v=X81a5TPpr0o Shelf Liner: https://www.amazon.com/Duck-EasyLiner-Non-Adhesive-Drawers-Cabinets/dp/B09YT65KX1 Regards, Genius idea I'm have to give that a go. Quote Share this post Link to post Share on other sites
john1962 0 Report post Posted March 18 On 3/16/2024 at 6:10 AM, SilverCreek said: 1. The hook gap is pretty narrow/ So if you are getting hits but no hookups, use a 2X short hook. It will have a wider hook gap for teh shank length. 2. The hackle is too long. Trim the hackle to proper size on some of the flies and see if there is a difference in the number hits you get. 3. Fish them close to the banks and under overhanging grass and trees. Fish them after right after a thunderstorm. They get washed into the stream Hooks and other materials are on order, going down the rabbit hole. 😉 I trimmed top and bottom and a little from the out riggers, I think it looks much better? Quote Share this post Link to post Share on other sites
Sandan 0 Report post Posted March 25 Here's my 2 cents. Your progress is very good, keep on working it'll only get better. Try to make your dubbing noodle tighter, It'll make the definition between the front and back sections of the ant more distinct. That brings up the question of how. I mostly do it this way. I moisten my fingertips and get 'em mostly dry, so there's friction between my thumb tip and index finger tip, twist in only one direction and only from the top of the noodle to the bottom. Some folks use dubbing wax. https://www.flyfisherman.com/editorial/fly-tying-dubbing/459202 Quote Share this post Link to post Share on other sites
john1962 0 Report post Posted March 25 10 minutes ago, Sandan said: Here's my 2 cents. Your progress is very good, keep on working it'll only get better. Try to make your dubbing noodle tighter, It'll make the definition between the front and back sections of the ant more distinct. That brings up the question of how. I mostly do it this way. I moisten my fingertips and get 'em mostly dry, so there's friction between my thumb tip and index finger tip, twist in only one direction and only from the top of the noodle to the bottom. Some folks use dubbing wax. https://www.flyfisherman.com/editorial/fly-tying-dubbing/459202 Thank you for your tips, I alway use too much dubbing, practice practice Quote Share this post Link to post Share on other sites
Fruitrollup 0 Report post Posted March 25 For what it’s worth, another technique for showing more definition in your segments is to leave more space between the two balls of dubbing. Think of the proportions as being 1/3 of the hook shank in the back as the first dubbing ball, the next 1/3 no dubbing just thread and hackle, then 1/4 hook shank as the head dubbing ball then whip finish. Quote Share this post Link to post Share on other sites