Search the Community
Showing results for tags 'caddis'.
Found 23 results
-
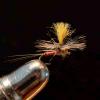
Here is one new from my vice, I think the trout going to like it.
-
This Caddis utilizes CDC feathers that have been used already on other flies. Many times (with quite a few patterns) you will use just the tip of the CDC feather. Therefor you have almost an entire feather unusable for your following flies. But I utilize a clip to get all the goodness from each feather I can. You can use other colored CDC here as well to create different colored caddis. Its easy to tie, and floats super high because of the CDC. And best of all, no need to use floatant as CDC has a natural oil in it that keeps it afloat. Get creative with different feathers for your wings and create whatever type of caddis fly you want. The review of these chip clips came out earlier this week, if you want to see that video and a closer detail of the clips, you can view that here... https://youtu.be/Wp-dAzGLmHs Materials--------- Hook: Risen barbless dry fly 100, size 14 Thread: Veevus 16/0, in black Body: Stripped CDC Dubbing Wing: Hen Saddle Hackle: CDC Feathers Head Cement: Solarez Ultrathin UV Resin Just letting you know, even though I did not use someone else pattern to create this fly (basically just came up with it on my vise), that does not mean someone else has not come up with this pattern or something close to it in the past. I didn't go off of other's patterns for this, but I am sure somewhere along the way I probably saw something similar to this. If you know of a pattern similar, or the same that has already been tied, don't hesitate to let me know. Just keep in mind, I am in no way trying to steal someone elses pattern, so I would appreciate you not getting angry, just simply tell me where you have seen it before, and Id be happy to mention that fly here in the description section. With so many different patterns out there, someone probably has come up with a fly like this before, and it might even be a fairly common pattern. Just not one Ive personally took note of in the past. Thank you!
-
Hi folks, Some of you may be familiar with Agostino Roncallo's CDC flies (not only CDC, but he's best known for those.) See https://www.flydreamers.com/en/fly-tying/agostino-roncallo-u99378 Here's one of his flies, the Mirage, tied with one CDC feather: https://www.youtube.com/watch?v=lp-37RH2MOc He says he uses grub fly hooks. J:son flies also use extended bodies, and unlike Roncallo, not just for mayflies - but they suggest an ultra-short dry fly hook, which they manufacture, for all their dry flies. My questions are: Are grub and caddis hooks the same? Is there a hook that will work for most extended body flies: Roncallo's CDC, J:son, "regular" extended body flies? (Could you kindly provide examples?) Finally, another (slightly unrelated) question, still about hooks: in Matching Major Eastern Hatches, Henry Ramsay calls for 2XS (short) wide-gap dry fly hooks such as the Tiemco 2488 when tying his CDC Adult Caddis. Do you think I can use regular-sized dry fly hooks instead, and just keep the body shorter (instead of buying more hooks)? Thanks! Confused in Connecticut PS The e-book My CDC Flies by Roncallo is available for free here: Part 1, Part 2.
-
In my opinion, the Stimulator is one of the best flies for using as an indicator. It floats high, is super buoyant, and mimics a large range of bug species. I could be wrong, but I believe it was originally created to be a stonefly imitator, however it can easily mimic hoppers, and even large caddis if tied to the correct sizes. Being very buoyant means that you can drop a bead head nymph behind it, or another small dry fly. This thing will hold up a large variety of other flies. Also, being such a large size, fish tend to hammer this fly hard! Some of my best strikes, where the fish literally came out of the water, have been with a stimulator. Using different colors of hackle, and dubbing can give you different effects. For my local streams in Colorado, this orange/brown body, with tan/grizzly head works great! But your local streams and rivers might vary. The hook commonly used for this fly is one with long shank, but with a curve to it. The hook I used is from Firehole sticks, but common hooks you can find at most fly shops will be Daiichi 1270 or TMC200. Of course you can use whatever you want, get creative! However a different shaped hook will give it a different look, and won't have that traditional Stimulator body curve to it.
-
The elk hair caddis should be a staple in all dry fly fishermans boxes, if they aren't in there already. This fly is probably one of the most effective and versatile dry flies ever created, and is right along side flies like the adams. This is relatively easy to tie, and once you get the hang of it, you can tie quite a few of them in an hour. Fill your box in short time, and have a fly that will fish well at most rivers and streams throughout America, and the rest of the world. The target species is obviously trout, but Ive caught bluegill, bass, and even some saltwater species on this fly before as well. So on my last trip, to Colorado Springs, this fly was the same pattern that Colin ended up landing 6 fish with! It was the most productive fly of the two day trip. So its not only very effective, but relatively easy and cheap to tie. The only expensive part of this fly is the hackle. But once you get a neck, you should be able to tie 100's or even thousands of these flies, in varying sizes. The most common color for hackle is brown, but you can tie it in with other colors as well. Just try to match caddis coloration for your specific area. So as always I am listing the materials used on this fly. Hook: Firehole sticks # 419 in size 16 Thread: Brown Veevus 16/0 Hackle: Brown Rooster Cape Dubbing: Yellow UV2 Fine & Dry Wing: Bleached Elk Hair Head Cement: Hard as hull
-
Soft hackle fly patterns have been around since pretty much when fly fishing started. That does not mean they aren't effective now. In fact, they are still very effective, and in some circumstances more so. They are relatively easy to fish, and fish tend to bite hard on them and will almost rip the rod out of your hand! They are really good at fishing the hard to fish riffles. Cast about 30 degrees down stream, and let the line take the fly. This style of fishing is called swinging. You can either just keep your rod tip still, or shake the rod for a little more action. When you reach the end of your drift, make a few little bumps on the tip of the rod, and leave it for an additional 10 seconds or so. Then take a step or two down stream and repeat. You cover a lot of water, and always seem to entice those super active fish! We all know that is a recipe for a fun fight! This fly is tied in an olive body with porterage hackle. The body is tied a bit fatter than most soft hackles, and it mimics the body of a caddis. The hackle mimics the legs and head of the caddis. Caddis tend to emerge quickly up to the surface, and trout know this. So swinging this fly quickly through fast water is a great way to get bites. These are quite easy to tie once you get the hang of tying in the soft hackle. I can usually tie out 10-20 of them an hour, so I can fill a box quite quickly! Also the materials on this are rather inexpensive, and you really dont use that many. Just a hook, thread, wire, poly yarn, and a porterage feather. Very simple, yet effective! As always I listed the materials I used on this fly. Hook: TMC 3761 in size 14 Thread: Veevus 6/0 in olive Tail: Antron Yarn Wire: Small Gold UTC Ultra Wire Dubbing: Olive/Brown Hares Ear Dubbing Hackle: Hungarian Partridge Cement: Hard as Hull
-
So this fly worked wonders for me last time I went and fished. The fish were destroying it on the top water, and almost coming out of the water after it. It was being hit hard! And I only don't have it anymore because I lost it, and not because it came apart. Its quite durable actually. So as promised here is the list of materials and step by step listed below. Materials.... Hook: Daiichi 1270 in size 18 Thread: Veevus 10/0 in olive Tail: White Polypro Yarn Ribbing: Veevus 140 Power thread in brown Dubbing: FTD's Skeeter Fuzz in caddis green Wing: Primo Deer Hair Strips died yellow or gold Hackle: Genetic Rooster Cape in Olive Head Cement: Bone Dry UV Curing Resin Step by Step.... Step 1: Start your thread half way down the bend of the hook. Step 2: Tie in a strand of 140 power thread Step 3: Tie in a few strands of polypro Step 4: Tie both the thread and polypro down deep into the bend of the hook Step 5: Dub a tapered noodle onto your thread with your dubbing Step 6: Wind the dubbing up the hook shank creating a tapered body Step 7: Make spaced wraps with the thread up the abdomen to create ribs Step 8: Trim off a fair amount of deer hair Step 9: Prepare that deer hair by removing the underfur, and aligning the tips in your stacker Step 10: Tie the prepared hair onto the top of your fly insuring the hair extends to about the end of the hook Step 11: Trim off the waste of the hair Step 12: Clean up the head Step 13: Dub on a bit more dubbing and create a bit of a tapered head Step 14: Prepare an appropriate sized hackle feather by cutting off the fuzzy parts, and snipping off the lower fibers. Step 15: Tie in the hackle so the shiny side is facing you Step 16: Wrap your hackle around the head as many times as you can to create a very thick and bushy head Step 17: Capture the hackle carefully insuring not to trap any fibers, pull all fibers rearward, and then tie back up onto the hackle a bit to insure no fibers are caught and facing forward. Step 18: Trim off the waste hackle Step 19: Whip finish your fly Step 20: Cement the head Last step: Fish your fly!
-
So I am changing up the way I do my fly tying videos for a few months, I am not doing the voice overs, instead I will be listing below the materials I used on the fly, and also a quick tutorial typed up on what to do. So click the read more to view all that. This fly is a caddis emerger, with horns. The body material used is really stretchy and makes nice ribbing on the abdomen. I really like using it. Just get a nice taper on the fly, and wind it on, not pulling too tight and you will have a perfectly segmented, and tapered body to the fly. So here is the materials used on the fly, and below this also look for the step by step on tying it. Hook: Firehole sticks #316 in size 14 Bead: 4MM black brass bead Lead: .025 and .010 lead wire Thread: Veevus 10/0 in black Abdomen wrap: Chewee skin in caddis green colo Horns: Black crystal flash Thorax dubbing: Hairtron dubbing in dark brown Glue: Hard as hull head cement Step 1 - Attach the bead Step 2 - Make 8-10 wraps with the .025 lead wire Step 3 - Make 10-12 wraps with the .010 lead wire Step 4 - Make wraps of thread over your lead wire to create a smooth taper. Step 5 - Cut the chewee skin with a taper Step 6 - Attach the chewee skin on the back of the hook on the thinner part of the tapered skin. Step 7 - make wraps up the hook, progressively getting looser as you reach the bead. Step 8 - Capture the skin, cut off the waste, and make tight wraps to keep it in place. Step 9 - Tie in a single strand of crystal flash, and then tie in the forward facing part rearward as well, making sure they are separated a bit. Step 10 - Dub on some hairtron dubbing and cover up over the horns a bit. Step 11 - Whip finish your fly. Step 12 - Brush out the dubbing slightly Step 13 - Add a drop of head cement. Step 14 - Fish your fly!
-
Sometimes you want to fill up a box with some caddis. When doing so, you dont always want a fly that take a long time to tie, instead you want something thats quick and easy. Well this is that fly. This caddis pupa is quite simple and quick to tie, and you can tie 8-10 an hour. They work with multiple sized hooks, and you can even use different colors as well. It is easy, and effective, which is what you want in a fly. Something you dont mind loosing too much, and something you can tie up easily, to insure you always have it in your box. Hook: Firehole Sticks #316 in size 12 Weight: Lead Wire in .010 and .025 sizes Thread: Veevus 10/0 in Brown Ribbing: Small D-Rib in Olive Dubbing: Hairtron in Olive and Brown Head Cement: Solarez "Ultra Thin"
-
Here's a caddis pattern thats popular in Scandinavia whenever there are caddis flies on the water. My variant utilizes the barbules on the CdC feather to give some extra spice to the fly. I have fished this pattern for a couple of seasons, and its becoming one of my favorite caddis patterns. English subs on the video (click subs button on YouTube) https://www.youtube.com/watch?v=S6ZsQwofLhk&t=3s
-
A very simple but effective pattern. Great for beginners! Thanks for watching! Any feed back is appreciated. https://www.youtube.com/watch?v=6YiNskABVlQ
-
Here is some Caddis pattern from my vice, all tied whit a little bit of foam
-
This is the second tying video I've made. Figured out how to get everything in focus! Anyways, this is a quick and easy X-caddis that just uses some Pearl Krystal flash, Dubbing and deer hair! Enjoy!
-
Here is one nice Caddis pattern... Deer hair, CDC and Organza combined together. I don't remember where this pattern originally came, but this is my version from it... I¨ll hope you guys like it https://www.youtube.com/watch?v=1fEbXYCtPnQ
-
Popa Caddis pattern. This fly imitates diving caddis. https://www.youtube.com/watch?v=AmeDlkk4Iv8
-
#12 Beading Needle ...now swing the thread under the fly, from its tension point at the eye back to the bend of the hook, underneath the body, loosely basting a clump o Zelon to the bottom of the fly in the process. Then back up to the eye. Whip finish. Glue the bottom side of the fly to fix the hackles. Any glue will doo. The small short shank hook (#20 DaiRiki 125) reduces the overall weight of the fly, which makes it a substantially better floating fly.
-
I have recently stumbled upon a nymph pattern that is called the squirminator. I would post the link but it seems like I am unable to do so. A quick google search can find it for you. The fly uses a tentacle off of those rubber toys that you can get at the dollar store, a jig hook, and egg yarn. People say that it is a good attractor, but looking at the video posted on the orvis website, I thought that it could be a nice uncased caddis imitation with a few tweaks. I used an egg hook, olive dubbing, a Hungarian partridge feather, and a green tentacle for the variation. Constructive criticism is greatly appreciated, tight lines.
-
 This is a video of Mike Lawson talking about the history of the fly and tying the EZ Caddis. We just wanted to share it with some hardcore fly tiers. https://vimeo.com/60180188 Visit the link to view the video
 -
How to tie a real good Buck Caddis in eight steps. http://www.w-fabisch.com/buck_caddis.html Have fun, Wolfgang
-
-
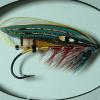
Hi all im new to this forum, but i have been reading along for some time now.. is a joy to see all of your wonderfull creations! i my self have just begon to tie realistic, i would like to show you my first attempt ever! what do you think? Steffan - Denmark
-
Been tying again. Tried a Neversink Caddis, Mylar Minnow and a Green Weenie this time.